
Setting Up Shipping Methods
In this chapter, we will cover:
Setting a minimum order amount to unlock free shipping Configuring Flat Rate Shipping Creating shipping classes Getting live shipping quotes with USPS Creating a table of shipping rates with Table Rate Shipping Allowing shipping only to the continental US Enabling free shipping on a per product basis Tracking your shipments with Shipment Tracking Exporting orders for fulfillment to ShipStation
Introduction
WooCommerce has some pretty smart defaults so you actually could start selling products right now. If you’re a new store owner, that’s actually not a bad thing. Setting up shipping methods can be quite complex and frustrating, which is why I always recommend starting with simple shipping methods and gradually exploring more complex methods.
The first two recipes deal with the default WooCommerce shipping options and give you a ton of functionality right out of the box. Flat Rate Shipping is quite configurable and can handle many different shipping options while still being relatively simple to set up. Free shipping is also quite easy to set up and you can entice users to buy more products by offering free shipping for a certain order total.
If you have very complex shipping instructions for your products we’ll be covering Table Rate Shipping, which can handle just about any type of shipping rule whether it’s calculated by weight, price, quantity, or type of item. It’s the ultimate Swiss army knife of shipping. We’ll also cover getting live shipping quotes from USPS and some extra tricks that certain stores might need.
Setting a minimum order amount to unlock free shipping
Free shipping is something that users are beginning to expect in the online world. You don’t have to have it available for every order but there should be someway to unlock it. Built into WooCommerce is a Free Shipping method that can be configured to unlock after a specified order total has been reached or when the customer has a special coupon. We’ll be setting the Free Shipping method to unlock after a customer has $100 of product(s) in their cart. With a little marketing on your site customers will be shooting for $100 even if they don’t need that much.
How to do it…
In order to set a minimum order amount to unlock free shipping, go through the following steps:
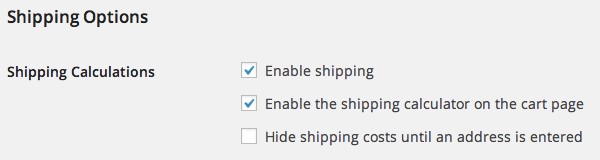
- From the WordPress admin, go to WooCommerce | Settings | Shipping. From here you can access all of the WooCommerce Shipping Options.
- Make sure that both Enable shipping and Enable the shipping calculator on the cart page are checked:
- Click on Free Shipping.
- Make sure Enable Free Shipping is checked.
- For the Free Shipping Requires… setting, select A minimum order amount (defined below). In the Minimum Order Amount field enter your minimum order amount to unlock free shipping:

There’s more…
If you have Free Shipping as the only shipping method for your store then users who purchase less than $100 of physical products won’t be able to checkout. You must enable some other shipping method for those users. In the next recipe we’ll look at configuring Flat Rate Shipping, which is one of the more simple shipping methods to set up. Before setting up any other shipping methods I highly recommend you look into Flat Rate Shipping.
Configuring Flat Rate Shipping
While free shipping is great, not all stores can have the markup required to give away free shipping to all orders. You could connect to a shipping service and get live quotes from them but that takes extra work getting an account and making sure all of your products have weights and dimensions. An easier option is to set up Flat Rate Shipping, which gives you the option of estimating costs by providing a per-order cost with an additional per item cost. For many stores this is good enough and even for stores that want to have more complex options, it’s good to try out the basic options first.
Getting ready
Make sure shipping is enabled on your site. See the Setting a minimum order amount to unlock free shipping recipe in this chapter to see how this is done.
How to do it…
In order to configure Flat Rate Shipping, have a look at the following steps:
- From the WordPress admin, go to WooCommerce | Settings | Shipping.
- Click on Flat Rate.
- Check the Enable this shipping method setting.
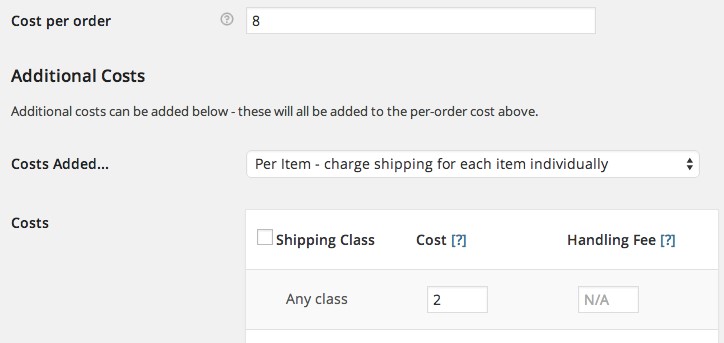
- We’re going to add a per-order cost that should cover most of our shipping costs. In our case we’re going to have a per-order cost of $8. Set the Cost per order setting to 8.
This works great for people who order a small handful of items. However, some users will order dozens or hundreds of items. We want to take those cases into account.
- Under the Additional Costs section set the Costs Added… dropdown to Per Item – charge shipping for each item individually.
In the Costs table right beneath that setting, we need to add a cost per item.
- Under the Cost column add a per item price of 2:
- Click on Save changes.
At this point, you have a pretty solid Flat Rate Shipping method. We’re going to take it one step further by presenting users with a flat rate as well as an express shipping rate, where we charge users a premium for the rush service.
- Under Add-on Rates, you can add an additional rate by setting this: Enter Rush Order | 15 | order. This should give the user the option of upgrading to a rush service for an extra $15 when choosing shipping options. Have a look at the following demonstrative screenshot:
There’s more…
There are tons of extra options here that we haven’t touched. If you have items of different sizes, you may add a per-item cost based on the shipping class of an item. Go through the following recipe to create shipping classes.
Creating shipping classes
Most stores will have a couple of products that are different in size, shape, or weight from the rest of the products, and trying to create one set of rules for all of your products can be a bit tricky. You might end up not estimating enough for some orders and estimating too much for other orders. Neither one is good for your business.
To help store owners, WooCommerce has shipping classes that allow you to group your products. With multiple groups you can create different shipping rules for each group, which will give you much more accurate shipping estimates. These shipping classes are used throughout WooCommerce. They’re used in Flat Rate Shipping (which is included in WooCommerce) and some of the WooCommerce extensions like Table Rate Shipping.
Getting ready
Make sure you already have at least one product in your store.
How to do it…
The first thing we have to do is create our shipping classes by performing the following steps:
- From the WordPress admin, go to Products | Shipping Classes.
- Fill out the Name field.
- Optionally fill out the Slug, Parent, and Description fields. These aren’t used by WooCommerce unless you’re doing custom coding.
- Click on Add New Shipping Class.
We’ve created one shipping class. Repeat this for as many shipping classes you need. Once you’re done creating shipping classes, we have to add them to our products.
- In the main WordPress menu, click on Products and then navigate to one of your products.
- Scroll down to the Product Data tab.
- Click on the Shipping tab.
- Select the class from the Shipping Class dropdown.
There’s more…
Your product now has a shipping class. This won’t change anything until you add special rules for that shipping class. You can do that in Flat Rate Shipping, Table Rate Shipping, and more.
Getting live shipping quotes with USPS
If you want to give users the exact shipping cost and not have to figure out how to do it with Flat Rate Shipping, you can get rates directly from USPS. That way, you can’t estimate the costs wrong and lose money on shipping. It takes a bit of extra work to set it up, but the results make it very easy for users to select the exact shipping method they want and there’s no confusion for the admin.
You could also get rates from UPS or FedEx and the process is very similar. The reason I choose to use USPS is because it’s slightly easier to set up. With USPS, WooThemes has been able to include credentials in the plugin, which means you have one less account to set up.
Getting ready
Make sure shipping is enabled on your site. See the Setting a minimum order amount to unlock free shipping recipe in this chapter to see how this is done. You’ll need to have weights and dimensions for all of your products. If they don’t have both weight and dimensions set, you won’t get any results. You’ll also need the WooCommerce USPS plugin (available on WooThemes.com) installed and activated on your site.
How to do it…
In order to get live shipping quotes with USPS, go through the following steps:
- From the WordPress admin, go to WooCommerce | Settings | Shipping.
- Click on USPS.
- Enable the shipping method by checking the Enable this shipping method setting.
- Enter your zip code in the Origin Postcode field.
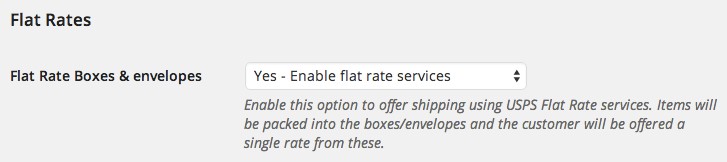
- Make sure the Flat Rate Boxes & envelopes dropdown is set to Yes – Enable flat rate services:
- Click on Save changes.
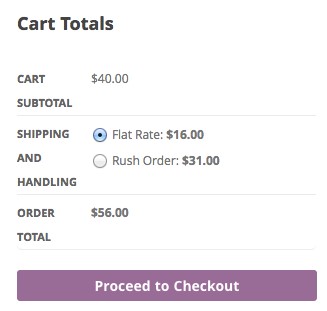
At this point, if you go to the frontend of your site and add a few products to your cart, you should see some quotes from USPS based on how many products you have and how many can fit into each flat rate box. Let’s take a look at the following screenshot that displays some details about Cart Totals:
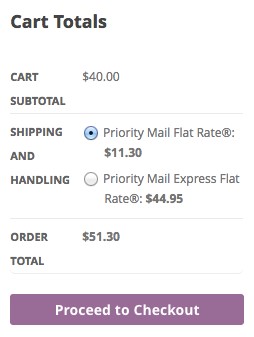
Naturally, you may see different rates from what’s shown in the preceding screenshot. It all depends on the size, dimensions, weight, and quantity of products you have in your cart.
Getting this far enables you to use the flat rate boxes from USPS, which is convenient for many businesses. However, some businesses want or need to have custom box sizes. You can enter your own box sizes and USPS will give you a custom quote for using your custom boxes. For entering custom box sizes, you need to perform following steps:
- Under API Rates, check the Enable Standard Services from the API setting. Some new fields will appear.
- For the Parcel Packing Method setting, select Recommended: Pack into boxes with weights and dimensions.
- Now add your custom box sizes. You can add as many as you need by clicking on the Add Box button as shown in the following screenshot:
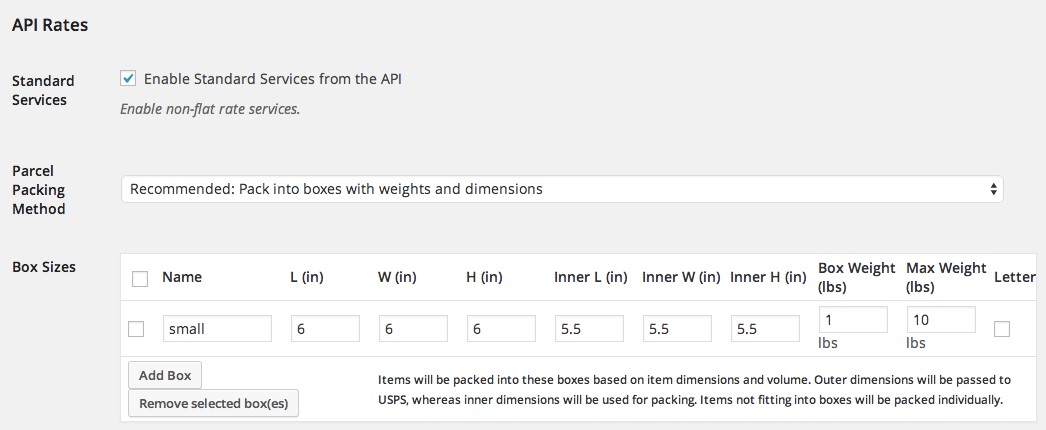
- Press Save changes to make sure everything is saved.
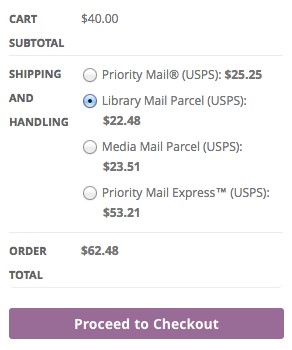
On the frontend, you should now see different rates. Have a look at the following demonstrative screenshot:
If you’re having trouble getting rates, make sure that all of your products have weights and dimensions set on the Edit Product page on the Shipping tab of the Product Data panel. Then make sure they can fit into at least one box. Then make sure you have a destination set on the Cart page. You can set a destination by clicking on the Calculate Shipping link.
How it works…
The USPS plugin includes a box packer. This box packer will automatically figure out how many items can fit in a box and then send the list of boxes to USPS. USPS does all of the rate calculation on their side and returns the results to WooCommerce, which are then displayed for the customer.
Creating a table of shipping rates with Table Rate Shipping
Getting live rates works very well for shipping small- to medium-sized packages. It doesn’t work very well when you want to ship something large such as furniture or something heavy such as sand. You’ll most likely have to contract a shipping provider that doesn’t have a plugin and you’ll have to create your own rates. That is exactly why Table Rate Shipping exists—for such custom scenarios.
One of the things Table Rate Shipping is very good at is having different pricing rules for different geographic regions. If you deliver furniture you most likely have a rate for local delivery, another rate for delivery in the state, another rate for out-of-state purchases, and a rate for international sales. These can be very easily set up with Table Rate Shipping.
Getting ready
Make sure shipping is enabled on your site. See the Setting a minimum order amount to unlock free shipping recipe in this chapter to see how that is done. You’ll need to have weights set for all of your products. You’ll also need the WooCommerce Table Rate Shipping plugin (available on WooThemes.com) installed and activated on your site.
How to do it…
The first thing we need to do is create zones for the different areas we’re delivering to. For creating Shipping Zones, we need to perform the following steps:
- From the WordPress admin, go to WooCommerce | Shipping Zones.
There’s a default zone, which we’ll leave in place. We can configure that default zone with pricing rules later. First, we need to create the rest of the zones.
- Enter a Zone Name.
- Under Type of zone, select This shipping zone is based on one or more countries.
- Start typing United States in the country box and select the correct suggestion:

- Click on Add shipping zone.
We need to create two more zones. One based on the state and the other based on the zip code. I’ll be using Denver, Colorado, as an example.
- For the state, you need to repeat the process we gone through earlier along with making sure you select This shipping zone is based on one of more states and counties for the Type of zone setting and then type in your state name.
- For deliveries in your city, it’s best to work with zip codes. Make sure you select This shipping zone is based on one of more postcodes/zips for the Type of zone setting. You can easily target multiple zip codes by using ranges or wildcards. For example, 80201-80209 or 8020*.
Now that we’ve created all of our shipping zones, it’s time to configure them with rates.
- Start with any zone you like, hover over the name of the zone, and click on Configure shipping method:
![]()
- Add a new table of rates to that zone by selecting Table rates and then clicking on Add To Zone:
![]()
- Click on the title of the table of rates to edit it.
With furniture being all sorts of different sizes, we’re going to use weight to come up with a cost.
- Leave Calculation Type as Per order.
- Click on + Add Shipping Rate.
- Fill in the rate. In our case, we’re going to create three different tiers: 0-100lbs, 101300 lbs, and 301+ lbs, all with different prices. In the following screenshot, we will fill rates as per these three tiers:
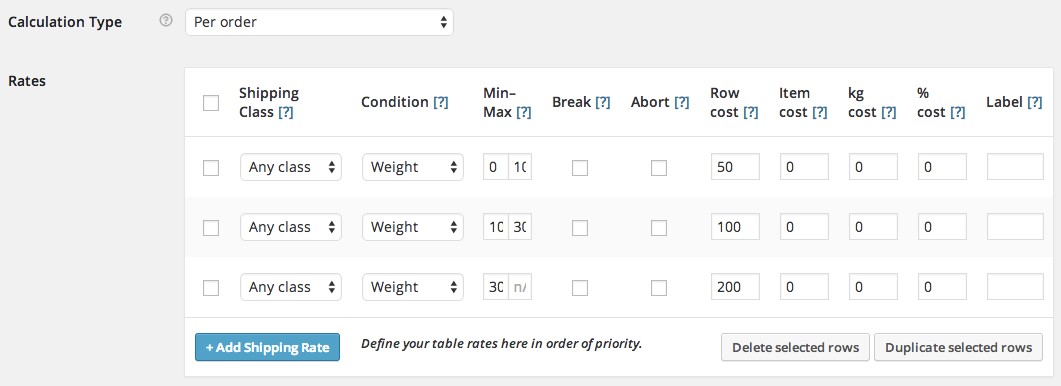
- Click Save shipping Method when you’re done.
- Repeat this for each zone.
That’s a lot of work but we’ve created some very custom shipping rates based on weight and destination.
There’s more…
There’s a lot in Table Rate Shipping. We could write a whole chapter on the many different ways you can use Table Rate Shipping but that’s not the best use of space. To see some more examples on the official documentation page refer to http://docs.woothemes.com/ document/table-rate-shipping-v2/.
Allowing shipping only to the continental US
Shipping to Alaska and Hawaii is very different from shipping to the rest of the continental United States. The rates and time to deliver are much higher. You may want to disable some or all shipping methods from shipping to those states. You could do this with Table Rate Shipping but if you don’t want to purchase that extension you could write a bit of code that does the same thing.
Getting ready
Make sure shipping is enabled on your site. See the Setting a minimum order amount to unlock free shipping recipe in this chapter to see how this is done.
How to do it…
In order to only allow shipping to the continental US, let’s go through the following steps:
1. Open up your theme’s functions.php file, which is located at wp-content/ themes/your-theme-name/, or a custom WooCommerce plugin in your code editor. Paste the following code at the bottom of the file:
function woocommerce_cookbook_only_ship_to_continental_us(
$available_methods ) { global $woocommerce;
$excluded_states = array( ‘AK’,’HI’,’GU’,’PR’ ); if ( in_array(
$woocommerce->customer->get_shipping_state(),
$excluded_states ) ) {
// Empty the $available_methods array
$available_methods = array();
}
return $available_methods;
}
add_filter( ‘woocommerce_package_rates’, woocommerce_cookbook_only_ship_to_continental_us, 10 );
2. Save and upload that file.
How it works…
When WooCommerce is calculating rates, we add some extra logic to determine whether the shipping methods are valid. We create an array of states, and if the shipping address has one of the states in the array, then we return a list with no valid shipping methods. If the shipping address doesn’t have one of the states mentioned, we do not do anything and return the list of states that was sent to this function.
There’s more…
This code snippet prevents all shipping methods from working. You could write additional logic using the $available_methods array to only remove certain shipping methods. You could, for example, only offer free shipping to the continental US and offer USPS quotes anywhere in the US.
| Enabling free shipping on a per product |
| basis |
The Free Shipping method that comes with WooCommerce is pretty flexible. What it’s not great at is allowing a store to mark one or two items to use free shipping for and leave the rest of the products to use your other shipping methods. We can use the shipping classes built into WooCommerce combined with a little bit of code to mark any number of products eligible for free shipping.
Getting ready
Make sure you have the free shipping method enabled on your site.
How to do it…
In order to enable free shipping on a per product basis, go through the following steps:
- The first step is to create the shipping class we’re going to use to mark items eligible for free shipping. If you don’t know how to create shipping classes, see the Creating shipping classes recipe in this chapter.
Once you have a shipping class, you need to copy the shipping class Slug, which we can use to identify that shipping class in the code.
- On the right-hand side of the Shipping Classes page you should see a list of shipping classes. Copy the Slug for the shipping class you just copied. The following screenshot shows the Shipping Classes section:

Now that we have our shipping class, we can write the code to add some extra functionality for that shipping class.
- Add the following code to your theme’s functions.php file, which is located at wp-content/themes/your-theme-name/ or a custom WooCommerce plugin:
/*
-
- Enable free shipping for orders with products that have the free-shipping shipping class slug
*
-
- @param bool $is_available
*/
function woocommerce_cookbook_enable_free_shipping (
$is_available ) { global $woocommerce;
// set the shipping classes that are eligible
$eligible = array( ‘free-shipping’ );
// get cart contents
$cart_items = $woocommerce->cart->get_cart();
// make sure there is something in the cart
if ( is_array( $cart_items ) && count( $cart_items ) >1
) {
// loop through the items checking to make sure they all have the right class
foreach ( $cart_items as $key => $item ) { if ( ! in_array( $item[‘data’]->shipping_class, $eligible ) ) {
// this item doesn’t have the right class.
return false
return false;
}
}
}
// nothing out of the ordinary return the default value return $is_available;
} add_filter(
‘woocommerce_shipping_free_shipping_is_available’,
‘woocommerce_cookbook_enable_free_shipping’, 20 );
That’s it! That’s all the code you’ll need. The last thing we need to do is add the shipping class to our products, as shown in the following screenshot. This is explained in detail in the Creating shipping classes recipe of this chapter.

How it works…
This code snippet works a bit counter-intuitively. It doesn’t automatically let any product with the shipping class use free shipping. It instead prevents every other product from using free shipping. The advantage of this is that there’s very little code and you can still use the free shipping settings. You could, for example, require that the user purchase $5 of goods before unlocking free shipping for your tiny items.
| Tracking your shipments with Shipment |
| Tracking |
It’s a common practice to give the user a tracking number for their shipments. In addition to being a nice experience for the customer, it’s also good for store owners because you’ll have less follow-up e-mails asking where their package is. A customer can click on a link in their confirmation e-mails and see exactly where it is.
Getting ready
If you have an order awaiting fulfillment in your store you don’t need to do anything. If you don’t have an order in your store, it’s best to create a test order using the Cheque Payment gateway so you don’t have to spend any money.
You’ll also need the WooCommerce Shipment Tracking plugin, available at WooThemes.com, installed and activated on your site.
How to do it…
To track your shipments with Shipment Tracking, take a look at the following steps:
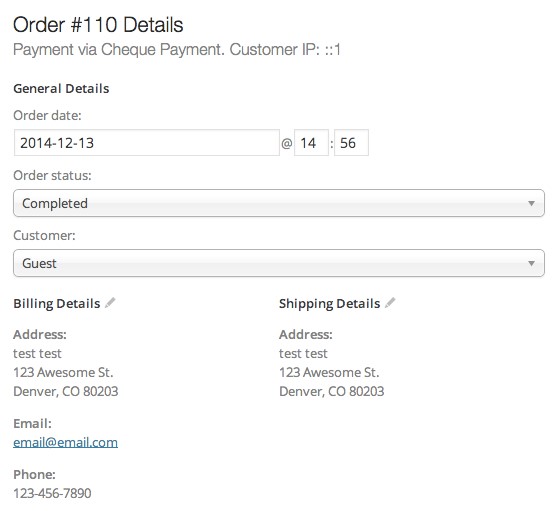
- From the WordPress admin, go to WooCommerce | Orders.
- Navigate to an order that needs fulfillment and click on it to go to the Order Detail page.
- On the Order Detail page, you’ll see a Shipment Tracking box.
- Enter data in Provider, Tracking number, and the Date shipped boxes. The more information you put in here, the more useful it will be for your customer:
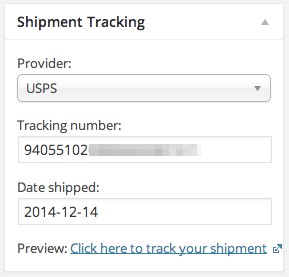
- Click on Save Order. This will save the order and refresh the page.
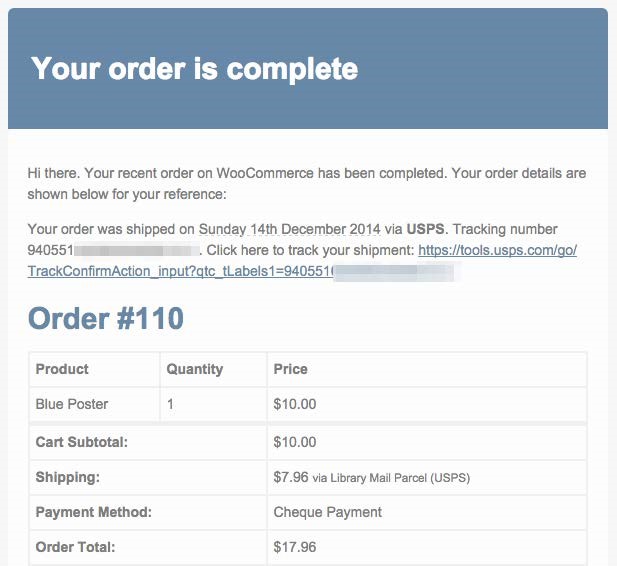
- Now change Order status to Completed:
- Click on Save Order. This will save the order and send out the order completed e-mail.
- The customer will see when their order was sent out with a link to get updates:
There’s more…
The Shipment Tracking extension works with dozens of providers all around the world and is the best solution. If you use USPS, there’s a complimentary plugin that makes the whole process easier. The Stamps.com API extension available at WooThemes.com will allow you to get the tracking number from the WooCommerce order screen and is a huge time-saver.
| Exporting orders for fulfillment to |
| ShipStation |
If you only have one store, then it’s pretty easy to manage all of the orders from within WooCommerce. If you have multiple WooCommerce stores or you sell items on EBay or some other e-commerce platform, then it’s worth exporting the orders out of all of the stores into one place where you can manage them. One of the best tools to do this is ShipStation.
Getting ready
You must install and activate the free ShipStation plugin from WooThemes.com.
ShipStation only works when it can talk to your site, so it must be accessible online. You can’t use a test site that’s running on your local machine.
How to do it…
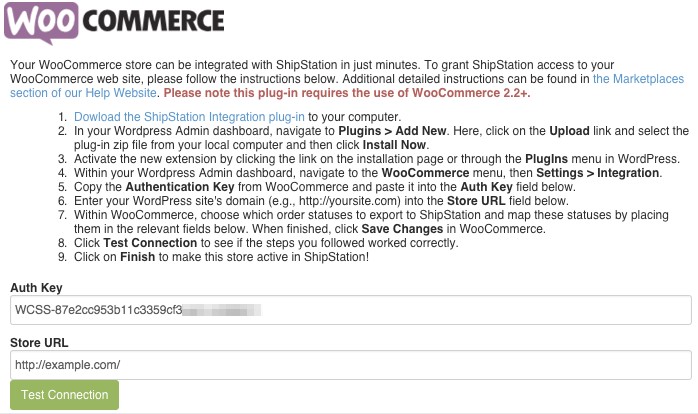
Getting your store to export orders is pretty painless. You need to copy a key from WooCommerce into your ShipStation account. The first part of this is getting that key from WooCommerce.
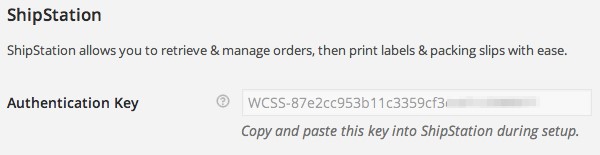
- From the WordPress admin, go to WooCommerce | Settings | Integrations.
- If this is the only plugin that adds an integration, the ShipStation page will be loaded automatically. If it’s not loaded automatically, click on ShipStation.
- Copy Authentication Key. You’ll need it during the ShipStation setup:
Now you’ll have to set up your ShipStation account.
- Go through their setup process. You’ll have to create an account, validate the e-mail address you entered, and then set up your store.
- Add a new store to your ShipStation account. You’ll need to enter your store’s URL and your Auth Key, as shown in the following screenshot:
- Click on Finish and you’re done.
When you start using ShipStation, you’ll want to set up a few shipping providers to get quotes through ShipStation and create shipping labels.
How it works…
The default settings for this plugin are pretty useful. By default, any processing— completed, on-hold, or cancelled orders—are sent to ShipStation. You can manage those orders in ShipStation, and once they’ve been marked as completed, they’ll also be marked as completed in WooCommerce.
There’s more…
This extension integrates very nicely with WooCommerce Shipment Tracker. If you mark an order as completed in ShipStation, it will also be marked as completed in WooCommerce. The shipping provider’s name and tracking number will be automatically filled out and sent to the customer.