
Managing Orders and Taxes
In this chapter, we will cover:
Sending a note to a customer Refunding an order Importing orders from another store Sending order information to third parties with the Advanced Notifications plugin Making the order numbers sequential Giving away products Manually entering tax rates Automatically calculating tax rates with the TaxJar plugin Setting a post code for correct taxation with the Local Pickup setting
Introduction
Running an e-commerce store still involves quite a bit of work to manage the store and fulfill your orders. You’ll have to know how to communicate with customers, how to refund orders, and how to give away sample products. The first set of recipes in this chapter tells you how to perform all of those essential functions.
WooCommerce is very flexible and there are plugins to help you customize your order numbers to match an existing system, to send order notifications to third parties for drop-shipping, and to import orders from an existing store.
The last set of recipes in this chapter is all about taxes. There are recipes to help you set up taxes yourself and there is also a recipe that shows you how to integrate with a third-party service that will handle all of the taxes for you.
Sending a note to a customer
You may occasionally need to reach out to customers and let them know something about their order. Maybe the order is delayed or maybe you want to ask them if you could swap one product for an equivalent product. When that happens, you’ll want it all documented in one place. You don’t want to use e-mail to do this because, a year down the line, you won’t know why you did what you did. That’s why WooCommerce has the built-in ability to contact a customer from the order page; the outgoing message is logged on that page.
Getting ready
You’ll need an order in your store. If you don’t have an order yet in your store, make a test order using the Bank Transfer gateway.
How to do it…
Communicating with customers can be done directly from the order page, by performing the following steps:
- From the WordPress admin, go to WooCommerce | Orders.
- Click on any of the orders.
- On this page, you’ll see the Order Notes panel and, at the bottom of the panel, there will be a field called Add note.
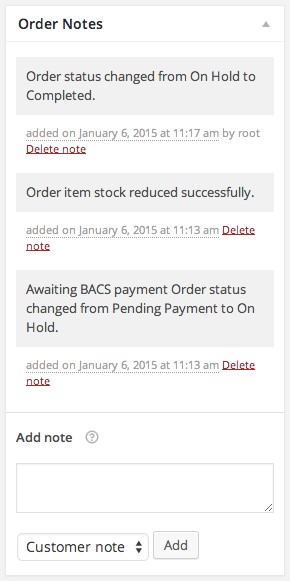
- Enter your note to the customer in the Add note field.
Customer notes can contain HTML. So, if you want to embolden or italicize something in your message, you could type in the HTML manually.
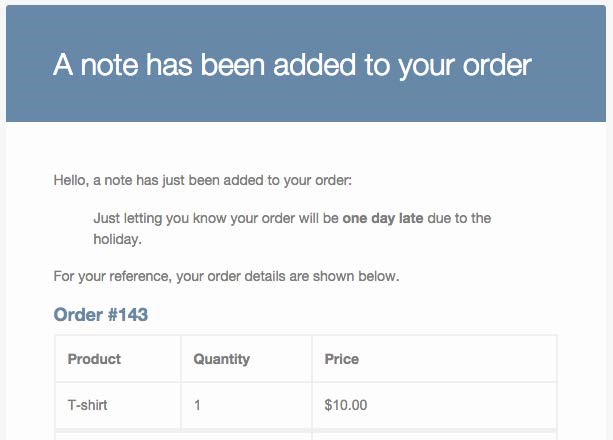
- Click on Add.
As soon as you click on Add, the e-mail will be sent out. This e-mail uses the WooCommerce e-mail template. WooCommerce templates can be customized; refer to the Overriding
WooCommerce templates recipe in Chapter 9, WooCommerce Theming, to see how to do this.
There’s more…
The Order Notes section also allows you to leave private notes. These are great for when a customer calls or messages you via social media or some other medium and you want to record the conversation. You can do this by changing the select box under Add note to Private note.
Only the outgoing message is recorded in the Order Notes section. If you need to log a customer’s response, you should use the Private note setting.
Refunding an order
No matter how good your product is, at some point you’ll have to refund an order. In just about any e-commerce system, you can manually log in to your payment gateway such as PayPal or Stripe and reverse the charges. That works, but it’s tedious and, if you have anyone helping you, you’ll have to give them access to your payment gateway, which not every store owner will feel comfortable with.
WooCommerce can do refunds directly from the order screen. This is a huge time saver because you don’t have to go into the payment gateway. It also reduces errors because you’re clicking on the Refund button from within the order itself instead of refunding a charge in the payment gateway, which you would have to cross-reference.
Getting ready
Most payment gateways support refunds directly on the order page. Both PayPal and Simplify Commerce support these refunds. So do Stripe and many other popular gateways.
You’ll need an order in your store—preferably one created using a gateway that supports refunds on the order page. I’ll be refunding a payment made through Stripe.
How to do it…
An order can be refunded from the order page in WooCommerce by performing the following steps:
- From the WordPress admin, go to WooCommerce | Orders.
- Click on one of your orders that was processed by a gateway that supports refunds.
- If you scroll down the Order Items panel, you’ll see a list of items, at the bottom of which is a Refund button.
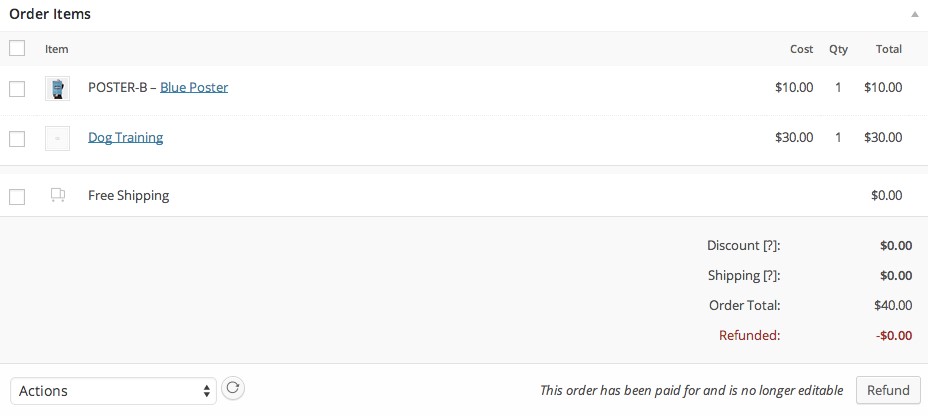
- Once you click on the Refund button, a new panel will slide open.
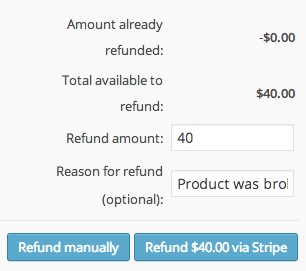
- You can enter the full amount or a partial amount in the Refund amount field.
- You can optionally fill in the Reason for refund field. This is logged along with the refund for your own information and won’t be shared with the customer.
- Click on the button that does not say Refund manually. My button says Refund $40.00 via Stripe.
- A pop-up window will confirm the refund. Click on Ok.
A loading icon will appear for a moment while all of the data is refreshed on the page. Then you’re done.
If you only see a button that says Refund manually, then your gateway doesn’t support refunds or it isn’t configured correctly.
Importing orders from another store
It’s really convenient to have a list of all of your orders in one place. If you have previously used another system for e-commerce, you don’t want to have to log in to multiple accounts to see whether someone made a purchase at one time. You also want all of your analytics in one place. It would be a shame to not see the growth of your store in one graph. You want to have all of that data in one place so you can get the most out of reports.
For these reasons, WooThemes released an importer to help users import their orders, customers, and even coupons.
Getting ready
You’ll need the Customer/Order/Coupon CSV Import Suite plugin, available on WooThemes. com, installed and activated on your site.
You’ll also need a CSV file to import. A sample CSV file you can import will be covered in this recipe.
How to do it…
The first part of the recipe is making sure your CSV is in the right format. The easiest way to copy the right format is to download the sample file and then use that as a base.
- From the WordPress admin, go to WooCommerce | CSV Customer Import Suite.
- Click on Sample Order CSV and it will be downloaded.
- Open the downloaded file in a program such as Microsoft Excel, Numbers on Mac, or Calc in Google docs (this can be accessed for free via your web browser).
Once you’ve opened up the file you’ll see a giant list of fields. Along the top will be the field labels. And the others rows will have some dummy data in them. All of the dummy orders in this are formatted correctly, so if your CSV file looks similar to this, then it should import correctly:
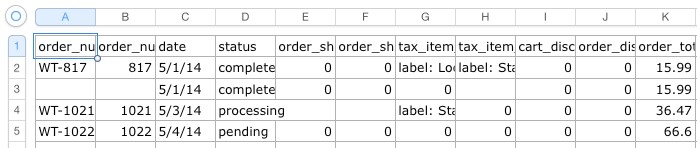
You can either delete the dummy order data and manually type in your orders or, if you have a ton of orders and that’s too much work, you can use your existing CSV and then rename the headers along the top so they match the headers in the dummy CSV.
Formatting the CSV can take some time and, if you name a column incorrectly, it could create problems down the line. If you have problems importing some data, it’s most likely because a column was incorrectly labeled or the value in the column isn’t in the right format.
Once you have the CSV file in the right format, you can import it by performing the following steps:
- From the WordPress admin, go to WooCommerce | CSV Customer Import Suite.
- Click on Import Orders.
- Fill in the Choose a file from your computer field.
You could use the OR enter path to file field, but that involves uploading a file via FTP and there could be permission issues. It’s far easier to use the regular file picker. The Delimiter field is there in case your CSV file, for some reason, uses a different character to separate the fields. A CSV file is so named because all of the values should be separated by a comma (Comma Separated Values), but some systems do use a semicolon or other separators for separating values. You should be able to choose a delimiter when you save or export a CSV file when using an application such as Microsoft Excel, Mac Numbers, or Google Docs. When in doubt, just leave the delimiter as a comma.
- Click on Upload file and import. You’ll be taken to an advanced settings screen.
I highly recommend checking the Dry Run setting so that, if you do format something incorrectly, you don’t have to spend much time fixing the mistake.
- If you’re trying to import the sample file, you’ll most likely have to check the Allow Unknown Products setting.
- Click on Submit.
The upload will start. It may take a while if you have hundreds or thousands of orders. When you’re done, you’ll see a report that will tell you whether there were any problems:
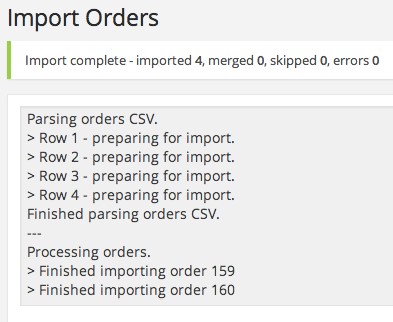
If you find any problems, you can delete the successful orders in the CSV, double-check whether the incorrect orders are in the right format, and then retry the upload.
When you’re done, you should be able to see the orders by clicking on WooCommerce in the main menu of the WordPress admin.
There’s more…
If you want to export a CSV file from one WooCommerce store and import it into another store, you can use the Order / Customer CSV Exporter plugin, also available on WooThemes.com.
| Sending order information to third parties |
| with the Advanced Notifications plugin |
If you have to work with manufacturers or drop-shippers, then you have to have some way to let them know that you’ve received an order and they should start producing or sending products. This doesn’t have to be limited to drop-shipping—it could also be a partner, an employee who just ships the products, or some other usage. With the Advanced Notifications plugin, you can send notifications to anyone, based on which products were in the cart.
You can also send notifications for all sorts of activity in your store, such as products being low on stock, out of stock, or when backorders are made. For this example, we’ll be sending a drop shipper an e-mail when an order gets placed.
Getting ready
You’ll need the Advanced Notifications plugin, available at WooThemes.com, installed and activated on your site.
You’ll also need a product already created on your site.
How to do it…
To send out notifications, we need to create a recipient in the notification settings and then set a recipient on the edit product page, by performing the following steps:
- From the WordPress admin, go to WooCommerce | Notifications.
- Click on Add notification.
- Fill in the Recipient name and Recipient email address(s) fields.
- Leave the Plain text field unchecked.
- Select Purchased from the Enable notifications field.
- Leave Notification triggers blank.
If you have a lot of products that send notifications, then you could create a category and send the notification for any products in that category. You can configure this with the Notification field. If you are sending a notification for one or two products, it’s best to do this on the product page, which we’ll do now.
- Optionally, check the Include prices and Include order totals fields, depending on how much information the recipient needs.
- Click on Save changes.
Now that we have a recipient, we can send them a notification on a per product basis. We will set this on the product page in the WordPress admin by performing the following steps:
- In the WordPress admin, click on Products and then navigate to any product.
- On the Product data panel, you’ll see a Notifications text box.
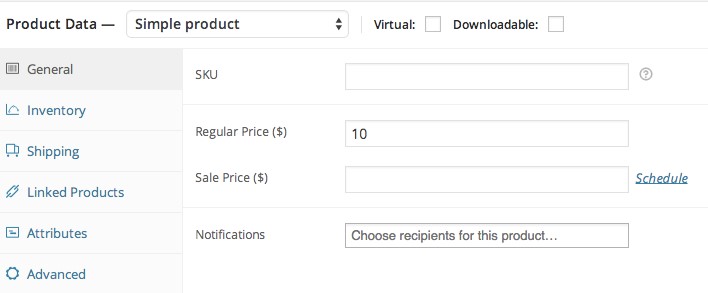
- Click on the box and select your recipient(s).
- Click on Update.
There’s more…
A more sophisticated way to configure these notifications is to create a shipping class for all of your drop-shippers. Then you can set a notification for the drop-shipper based on the shipping class of the product. This can be done through the Notification triggers field.
Making the order numbers sequential
WordPress uses the same ID system for pages, posts, media, products, and orders. That means that, if you add a new product and an image for that product, the next order will be three numbers higher than the previous order. As a store owner, employee, or anyone not familiar with the inner workings of WordPress, that might be confusing.
In the e-commerce world, with accounting software, drop-shippers, customers, and everything else going on, it’s really helpful to have consecutive order numbers. There is a free plugin that will make all order numbers sequential.
How to do it…
We can install the WooCommerce Sequential Order Numbers plugin by performing the following steps:
- In the WordPress admin, click on the Plugins menu and then on Add New.
- Run a search for the WooCommerce Sequential Order Numbers plugin.
- Install and activate the plugin.
There isn’t any configuration necessary for this plugin. By simply installing it, all future order numbers will be in the correct order.
There’s more…
There is a lot more you can do with order numbers. You may want to set a prefix or, suffix, or choose the starting order number, for example, Pat_0001. This can be done with a premium version of the same plugin called Sequential Order Numbers Pro, which is available on WooThemes.com.
Giving away products
If you often have customers switch one product for another or if you have a downloadable product that you want to give away to customers, then it can be a bit of a pain to manually create an order. You could manually type in their information, run a search for the products, set the payment and shipping info, and then save the order. That does work, but it’s time-consuming.
To speed things up, there’s a handy extension that asks you for a customer name, asks you for one or more products you’re giving away, and then creates the order for you. It probably cuts the amount of time you spend giving away a product in half.
Getting ready
You’ll need the WooCommerce Give Products plugin, available at WooThemes.com, installed and activated on your site.
How to do it…
Giving away products with this extension can be done on the special Give Products page by filling in a few fields and clicking on a button:
- From the WordPress admin, go to Products | Give Products.
- Type in the customer’s name, e-mail, or ID into the customer field and click on the correct autosuggestion.
- Type in the product you wish to give the user and click on the correct autosuggestion. You can enter as many products as you wish to give away.
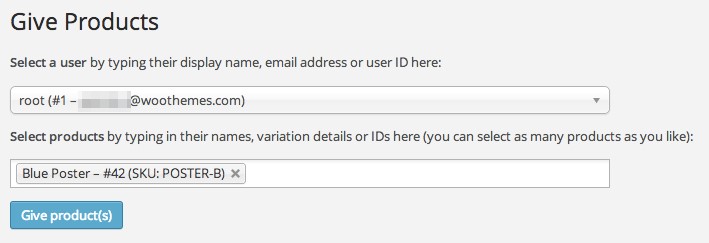
- Click on Give product(s).
The extension will do all the hard work of creating the order for you and sending the customer an email, letting them know they were gifted a product. If it’s a downloadable product, they’ll also receive a link to the product.
Manually entering tax rates
E-commerce isn’t all fun and games, of course. You do have obligations to operate lawfully and to pay taxes. WooCommerce doesn’t know the tax rates unless you connect it to a thirdparty service or enter them manually.
In the United States, it’s typical that you have to pay state tax when the buyer is in a state where you have your nexus. Nexus means a physical presence such as an office or warehouse.
You can enter your tax rates manually into WooCommerce. Once the user enters their location during the checkout process, WooCommerce will automatically calculate the taxes and add them to the total.
Getting ready
You’ll have to consult a tax expert to determine the tax rates you need to enter into your store. You could have federal rates, state rates, municipality rates, zip code rates, and more. It all depends on the laws of your business and the laws of the buyer.
How to do it…
Using the following steps, we first set our basic tax settings and then enter our rates:
- From the WordPress admin, go to WooCommerce | Settings | Tax.
- Make sure the Enable taxes and tax calculations setting is enabled. Otherwise, WooCommerce will skip right over the tax calculations.
- Choose if you want to enter your prices with or without taxes by choosing an option for the Prices Entered With Tax field. In the US, it’s common to enter prices without taxes.
- Choose whether you want to display prices with tax included or with tax excluded by choosing an option for the Display Prices in the shop select box. In the US, it’s common to display prices without taxes.
- Choose an option from the Calculate Tax Based On drop-down. If you are operating in the US, you may want to select Customer billing address. Please consult with a tax expert to verify whether this is the best option for your store.
- Click on Save changes.
We’ve configured our basic settings. Now we need to enter our rates.
- Go to the WooCommerce | Settings | Tax page and click on Standard Rates.
On this page, we can enter as many rates as we need.
- Click on Insert row.
- Enter the Country Code, State Code, ZIP/Postcode, City, or whatever is appropriate to determine your tax rate.
For a tax that applies to the entire state of Colorado, I would enter the Country Code and State Code. If I had a tax rate that applies to a specific city in Colorado, then I would enter the Country Code, State Code, and City. You don’t need to enter more information than necessary.
- Enter the tax rate in the Rate % column.
- Add a name for the tax in the Tax Name field. This could be as simple as Colorado state tax. Please check with your accountant whether the tax needs to be called by a specific name.
- Enter a number for the Priority field. The priority is used to limit one tax rate per priority. So, if there is no reason someone should be billed taxes for two different zip code ranges, make sure they have the same priority and only the first matching rate will apply. If you want to have a national tax rate, a state tax rate, and a city tax rate, make sure they’re all using different priorities. You could have one priority for all national rates, another for state rates, and yet another for all city rates.
- You can optionally check the Compound and Shipping settings. Your tax expert can let you know how the taxes should be applied and if you need to apply them to shipping costs or whether the tax rate needs to be compounded.
- Click on Save changes.
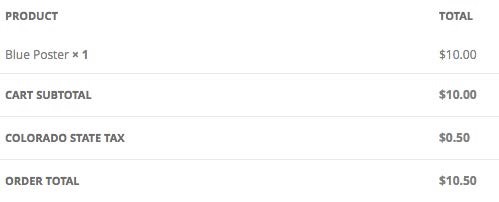
How it works…
On the checkout page, as soon as the customer enters their address, WooCommerce will calculate the applicable taxes, add them to the total, and display it to the customer, as shown in the following screenshot:
There’s more…
If you don’t want to consult with a tax expert, there are several tools you can use to calculate the tax rates for you. Refer to the next recipe to learn more about a third-party service that does it all automatically.
You can also see the official documentation at http://docs.woothemes.com/document/ setting-up-taxes-in-woocommerce/.
Automatically calculating tax rates with the TaxJar plugin
If you already know a tax expert or you already know the tax rates, then it isn’t too much of a pain to enter the tax rates manually. But if you don’t know a tax expert, then it’s a bit of work and it’s probably cheaper and faster to use a third-party tool to calculate the tax rates for you.
One such tool that’s geared for US businesses is TaxJar.
Getting ready
You should sign up for a TaxJar account. They have a 30-day free trial.
How to do it…
Using the following steps, we first download the free TaxJar plugin from WordPress.org:
- In the WordPress admin, click on the Plugins menu and then on Add New.
- Run a search for the TaxJar – Sales Tax Automation for WooCommerce plugin.
- Install and activate the plugin.
Now that we have the plugin installed, we have to configure it.
- From the WordPress admin, go to WooCommerce | Settings | Integrations.
- If TaxJar is the only integration you’ve installed, it will automatically be loaded. Otherwise, click on TaxJar.
- Make sure the Enable TaxJar setting is checked.
- Enter your API token in the API Token field. If you don’t know where to find that in TaxJar, click on the link underneath the field.
- Enter the Ship From Zip Code and Ship From City fields.
- Click on Save changes.
Your store will contact TaxJar to calculate taxes before displaying them to the customer at checkout.
If you have multiple addresses, you can enter these in TaxJar and they’ll make sure to check against these extra addresses while checking tax rates.
There’s more…
At the start of 2015, Europe introduced new legislation for taxing downloadable goods (such as e-books, video courses, and so on) being sold in the European Union. This affects all sellers and not just sellers in Europe. If you are selling digital goods to Europe, you should look into VATMOSS. One popular service that checks and calculates these rates for you is Taxamo.
For more information, go to http://www.woothemes.com/2014/12/handling-eu-vatwoocommerce/.
Setting a post code for correct taxation with the Local Pickup setting
If you’re selling to people in different parts of the country or the world, you normally base the tax on the location of the customer. For that reason, you don’t normally have to set your own zip code or city. But if you sell to people outside your city most of the time, but also have the Local Pickup shipping method selected, then you’ll need to set your zip code and city.
How to do it…
This is an edge case, so there isn’t any way to do this in the admin. You have to do this with some custom code, using the following steps:
- Open your theme’s functions.php file, located under wp-content/themes/yourtheme-name/, or create a custom WooCommerce plugin.
- At the bottom of the file, enter the following lines of code to set your city: add_filter( ‘woocommerce_countries_base_city’ , ‘woocommerce_cookbook_countries_base_city’ ); function ‘woocommerce_cookbook_countries_base_city'() {
// Replace with your store town/city return ‘Townland’; }
- In this snippet, replace Townland with the name of your city.
- And, below that, add the following lines of code to set your zipcode:
add_filter( ‘woocommerce_countries_base_postcode’ , ‘woocommerce_cookbook_countries_base_postcode’ ); function woocommerce_cookbook_countries_base_postcode() {
// Replace with your store postcode / zipcode return ‘45040’; }
- Replace 45040 with your actual zip code.
Now that you’ve set your city and zip code, the Local Pickup method will use those for taxation. You still need to set the rates. See the Manually entering tax rates recipe we’ve covered earlier.