
Changing the Product Organization
In this chapter, we will cover:
Changing the number of products per page Changing the number of columns on the Shop page Adding filtered navigation with the Layered Nav widget Making the Add to Cart button go straight to the checkout page Adding a custom tab to the product page Adding social media sharing icons to your product page Adding a Product Search widget Allowing users to search by SKU Adding extra sorting options on the Shop Page Sorting products from the oldest to the most recent Adding a site-wide notice Displaying the amount saved for on-sale products Displaying the amount saved as a percentage Changing the breadcrumb separator
Introduction
In Chapter 2, Adding Products, we were able to add all sorts of products to your store. Now that you have products in your store, it’s time to customize your product page exactly the way you want. We’ll be adding more tabs, changing sale prices, adding social media icons, adding special search bars, and much more. WooCommerce is incredibly modular and extendable. That’s why there are so many free plugins on WordPress.org. We’ll be configuring a lot of free plugins and, when there isn’t a free plugin available, we’ll look at achieving what we want with a line or two of code.
At the end of this chapter, you should have your product and category pages customized to your liking. In Chapter 4, Running a Membership Site, we’ll talk more about membership sites and how they work.
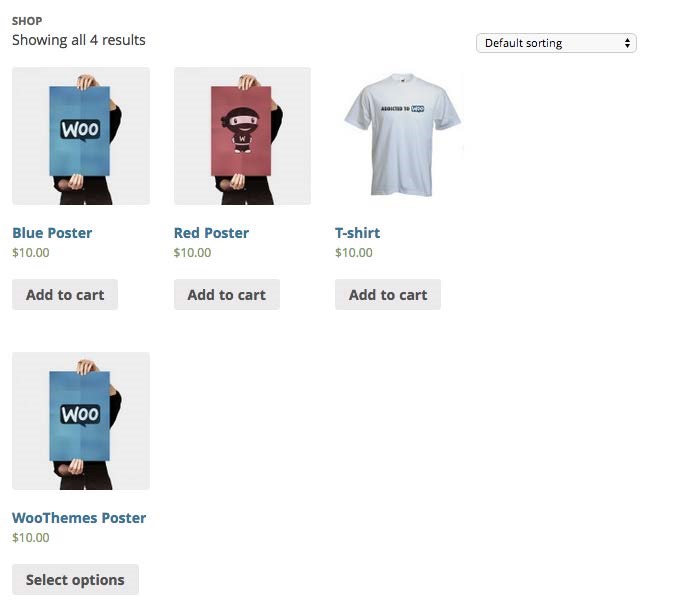
Changing the number of products per page
WooCommerce assumes you have dozens of products in your store. For that reason, the layout is four products across and 10 products per page. That’s a really nice format for most stores. But for some stores that have very few products or stores that have thousands and thousands, you may want to change that format.
Getting ready
You need to have a few products on your site, otherwise you won’t be able to see any of the changes.
How to do it…
In order to change the number of products per page, go through the following steps:
- In the WordPress admin, click on the Plugins menu and then on Add New.
- Run a search for WooCommerce Product Archive Customiser.
- Install and activate the plugin.
- Once we have the plugin installed, it’s time to configure it. Under WooCommerce | Settings | Products | Display, you’ll find a new Product Archives settings section. Change the Products per page setting to 20.
- Scroll down to the bottom of the page and click on the Save changes button.
There’s more…
There are plenty more settings included in the WooCommerce Product Archive Customizer that you can play with. It’s incredibly easy, for example, to change the number of columns, add a badge to new products, or hide reviews.
| Changing the number of columns on the |
| Shop page |
You can do a lot with the free plugins available at WordPress.org, without any developer skills or with a limited budget, and this is probably the right course of action. If, however, you have time to dig into the code, then you can sometimes get modest speed increases by writing a few lines of code instead of loading a big plugin. With this recipe, I’m going to show you how to change the number of columns on your shop page without a plugin. We’re going to code it manually.
Getting ready
You’ll need to have a few products on your site so that you can see how the columns rearrange.
How to do it…
In order to change the number of columns on the Shop page, go through the following steps:
- Open up your theme’s functions.php file, located under wp-content/themes/ your-theme-name/. Optionally, you could create your own custom WooCommerce plugin as instructed in the Creating a WooCommerce plugin recipe in Chapter 1, WooCommerce Basics.
- In it, we’re only going to add four lines of code: add_filter( ‘loop_shop_columns’,
‘woocommerce_cookbook_loop_shop_columns’, 20 ); function woocommerce_cookbook_loop_shop_columns( $cols ) { return 3;
}
If you save and upload this file, you’ll notice that there are three columns, but they don’t look very good because we haven’t changed our CSS. To make this look nice, we have to alter our CSS to match.
- Open up your theme’s style.css stylesheet so we can add some extra styles.
- Paste in the following code at the bottom of your stylesheet:
.woocommerce ul.products li.product, .woocommerce-page ul.products li.product{ width: 30.75% }
- Save the file and upload it.
Your columns should now fill the available space.
Most themes add extra margins and padding on your products. For that reason, you need to leave an extra buffer in your calculations. That’s why, for three products, I chose to use 30.75 percent instead of 33.3 percent. You can tweak the width value until you get it just right.
There’s more…
Some custom themes use pluggable functions. If the number of columns isn’t changing, there are some alternative ways to write this code so that it works with pluggable functions. You can find a few examples at http://docs.woothemes.com/document/changenumber-of-products-per-row/.
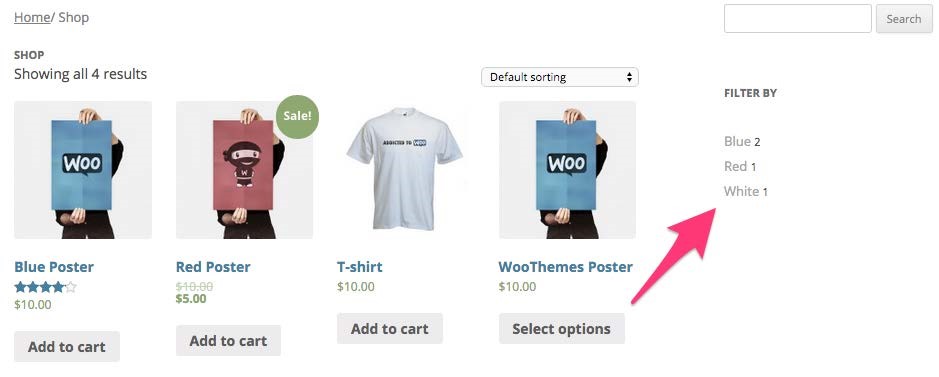
Adding filtered navigation with the Layered Nav widget
When you have thousands, hundreds, or even dozens of products, it becomes very important to give your customers enhanced search functionality to find the product they want. One of the ways of doing that is to give them a way to filter search results. WooCommerce has filtering logic built right into it with the Layered Nav widget.
Getting ready
You’ll need to have a few products on your site and at least some of those products will need to have global attributes set as per the Adding global product attributes recipe in Chapter 2, Adding Products.
How to do it…
If your products already have attributes set, then giving your customer the ability to filter the shop page or search page is very easy. You only need to add the Layered Navigation widget to the page.
- Go to Appearance | Widgets.
- Under Available Widgets, click on WooCommerce Layered Nav and then add it to the appropriate sidebar.
WordPress themes can have multiple sidebars, and they vary on a per-theme basis. If you don’t know which sidebar to use, a good place to start is by trying the main sidebar or primary sidebar. If you are still having problems, then the next best bet is to try each sidebar until you find the right one.
- Once the widget is added to a sidebar, it should slide open. At this point, you can change the Title, Attribute, and Display type. The defaults are perfectly good for this example, so I won’t be changing them.
- Click on the Save button.
- Go to the frontend of your store and you should see the Layered Nav widget.
There’s more…
In addition to the Layered Nav widget, which is great for attributes such as color and size, there’s also a WooCommerce Price Filter that is great for letting a customer only see products in their price range. There is also the WooCommerce Layered Nav Filters, useful when you have a ton of Layered Nav widgets. With this, users can see all of the filters in one place and disable them easily.
These widgets only work on pages that display a list of products, such as the Shop page. The widgets won’t do anything or even show up on a page that doesn’t display products.
Making the Add to Cart button go straight to the checkout page
On the flip side of having hundreds or thousands of products, you may only have one product, at which point the cart becomes pretty useless. In that case, you can actually have a customer skip right over the cart and land on your checkout page. It’s one less step the customer has to make and keeps them focused on checking out rather than cruising the site, which should increase conversions.
We have covered a similar recipe, Skipping the cart and going straight to checkout, in Chapter 7, Modifying the Checkout Process, which uses code instead of a plugin.
Getting ready
You’ll need to have a product in your store.
How to do it…
This is a feature a lot of store owners have asked for, so there are several prebuilt solutions out there. We’ll be using a plugin from WordPress.org that is quite straightforward and simple with no options, named Skip Cart WooCommerce.
- In the WordPress admin, click on the Plugins menu and then on Add New.
- Run a search for Skip Cart WooCommerce.
- Install and activate the plugin.
- Now go to the frontend of your site and add a product to your cart. This action will automatically take you to the checkout page.
At the time of writing, there is a PHP warning in this plugin. It will most likely be fixed by the time of publication. They aren’t serious issues, so you can simply hide the warnings by disabling WP_DEBUG in your config file. For more information, refer to http://codex.wordpress.org/WP_DEBUG.
There’s more…
You may notice that the button says Add to Cart, but there technically isn’t a cart. If you wanted, you could change the product button to Checkout or something similar. This can be achieved with some code snippets available at WooThemes.com. For more information, refer to http://docs.woothemes.com/document/change-add-to-cart-button-text/.
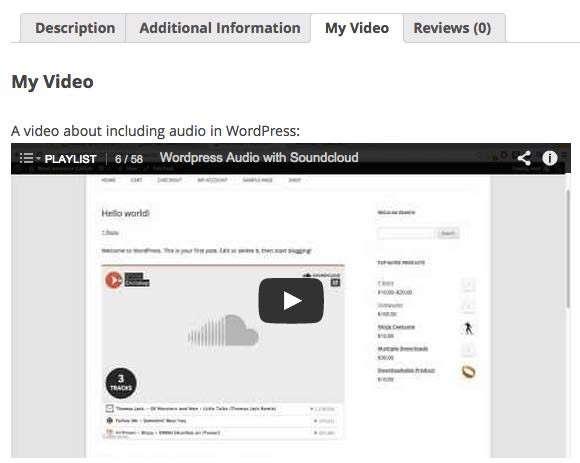
Adding a custom tab to the product page
For most businesses, you can put all of the product information you need into the description field. For some industries, you may have extra information you want to add to the product page. One of the best ways to add this information is by adding an extra tab to the product page. That way, it’s not in the way but it’s still accessible.
Getting ready
You need to have a product in your store.
How to do it…
The first part of setting this up is installing the right plugin.
- In the WordPress admin, click on the Plugins menu and then on Add New.
- Run a search for WooCommerce Custom Product Tabs Lite.
- Install and activate the plugin.
- Now that we have the plugin activated, it’s time to configure it. Go to the Products menu in the WordPress admin and select one of your products.
- Under the Product Data tab, click on Custom Tab. From here, you can add a title and whatever content you like. It could be an embed code from a site such as YouTube, HTML, or plain text. It’s entirely up to you.
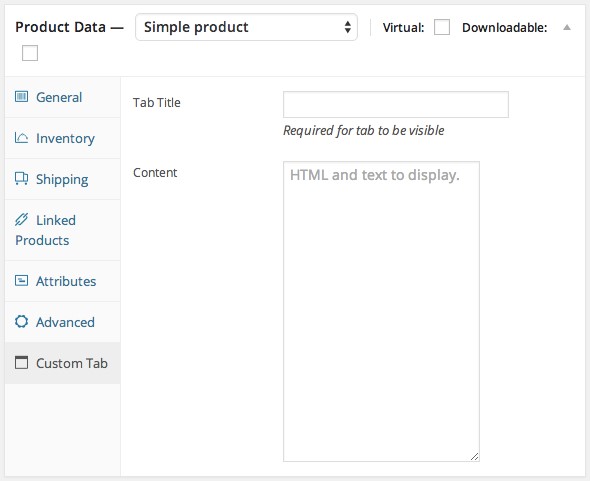
- Click on the Update button.
- Go to the frontend of your site and look at the tab with the content you entered.
There’s more…
This plugin is really simple, which is great for people who are just getting started. If you want a few more customization options, there is a premium version of this plugin available on WooThemes.com. It gives you more control over the tab order on a per product level or on a site-wide level.
| Adding social media sharing icons to your |
| product page |
There are a ton of social media sharing plugins for WordPress. Unfortunately, not all of them work very well with WooCommerce. With this recipe, we’ll be installing a plugin and telling the plugin exactly where we want our social media icons so that they look nice on our product page.
Getting ready
You need to have a product in your store.
How to do it…
The first part is installing the plugin. We’ll be installing Jetpack, which is built and managed by WordPress.com. After we get it installed, we only need very minor tweaks to make it work well with WooCommerce.
- In the WordPress admin, click on the Plugins menu and then on Add New.
- Run a search for Jetpack by WordPress.com.
- Install and activate the plugin.
- In the WordPress admin, click on the newly created Jetpack menu and then on the Settings submenu.
Jetpack is known to have a lot of functionality built in. You’ll want to look through what’s possible and enable it. We only need to turn on the Sharing module.
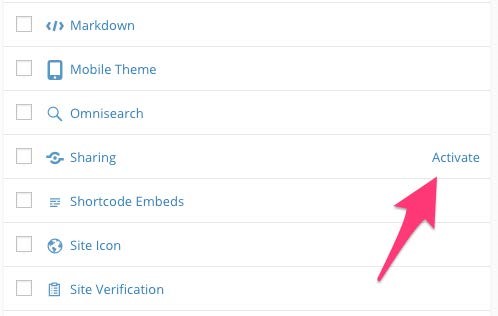
- Now that it’s enabled, you’ll have to configure it. Scroll down to the same Sharing module, hover over it, and click on Configure.
At this point, you’ll see a settings page with various options. The first step is to select which services you want listed on your site. You can pick as many as you like.
- Drag-and-drop services from Available Services to Enabled Services.

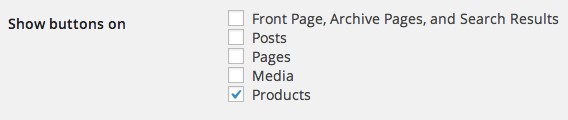
- Make sure the social media icons will be shown on the product pages.
- Click on Save Changes.
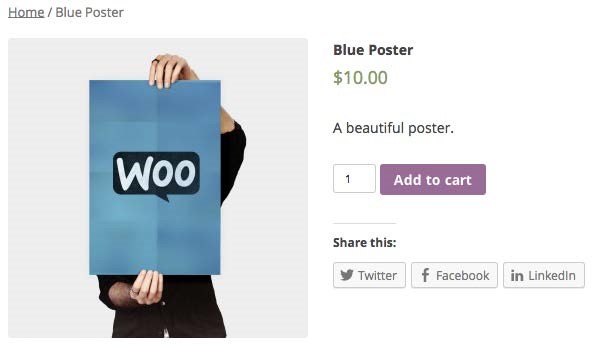
If you went to a product page on your site right now, you’d see the social media icons, but they’re all the way at the bottom of the product page – even beneath the description and additional information tabs. With a bit of custom coding, we can put them exactly where we want them.
- Add the following code to your theme’s functions.php file, located under wpcontent/themes/your-theme-name/, or your custom WooCommerce plugin:
add_action( ‘woocommerce_share’,
‘woocommerce_cookbook_social_share_icons’, 10 ); function woocommerce_cookbook_social_share_icons() { if ( function_exists( ‘sharing_display’ ) ) { remove_filter( ‘the_content’, ‘sharing_display’, 19
);
remove_filter( ‘the_excerpt’, ‘sharing_display’, 19
);
echo sharing_display();
}
}
All done! Load up your product page and see the social media icons right beneath the Add to cart button.
How it works…
The Jetpack plugin handles social media sharing and icons. The code we wrote moves the output from Jetpack to exactly where we want it to be.
The first part of the code adds extra functionality on the WooCommerce product page. Within that code, we remove the old Jetpack output and print out new output. The elegant part of this code is that the Jetpack output only changes on the WooCommerce product pages. You could use the same social sharing functionality for your blog posts and the social sharing buttons will appear at the end of the post, which, of course, is controlled through Jetpack.
Adding a Product Search widget
There are a number of tools built into WooCommerce that people don’t even know about. One of those tools is the Product Search widget. It works in a very similar way to the default search widget in WordPress, except that this one only searches for products. It won’t show any results for your pages, posts, or other custom post types.
Additionally, the results it does show are displayed as they would appear on the shop page. This will usually look better than the standard search page. If you have a site that’s primarily an e-commerce site, I recommend using the Product Search widget so your users can find what they want a little faster.
How to do it…
To add a product search widget, let’s have a look at the following steps:
- Go to Appearance | Widgets.
- Under Available Widgets, click on WooCommerce Product Search and then add it to the appropriate sidebar.
- You may optionally add a Title to the widget.
- Click on Save.
There’s more…
The default Product Search widget that comes with WooCommerce is already very useful. If you want to have instant search results as you type or if you want to control the search algorithm, there is the WooCommerce Product Search extension available at http://www. woothemes.com/products/woocommerce-product-search/.
Allowing users to search by SKU
One of the best things about WooCommerce is how simple it is. The developers purposefully don’t include every possibility because it makes the interface too confusing. One of the settings that some people do end up needing that’s not included in WooCommerce is the ability to run a search for a product by SKU. Luckily, there’s a free plugin on WordPress.org that can enhance the WooCommerce Product Search widget with this functionality.
Getting ready
Make sure you have the WooCommerce Product Search widget set on one of your pages.
How to do it…
In order to allow users to search by SKU, go through the following steps:
- In the WordPress admin, click on the Plugins menu and then on Add New.
- Run a search for Search by SKU for WooCommerce.
- Install and activate the plugin.
How it works…
The Search by SKU for WooCommerce plugin is one of those plugins that does just one thing and does it very well. There are no settings to configure—it just works.
There’s more…
There are more of these plugins available for free on WordPress.org. Another popular variation of this plugin is the Search by Product Tag for WooCommerce plugin made by the same author.
| Adding extra sorting options on the Shop |
| page |
When you’re on the WooCommerce shop page or on any of the category pages, there are five ways to sort your products: popularity, average rating, newness, price low to high, and price high to low. That’s a pretty good range of ways to sort your products. Of course, it doesn’t cover every possibility. You may want to have your products randomly sorted, sorted by products on sale, or sorted alphabetically.
As is typically the case with WordPress, someone has already thought of all of these and bundled them into a free plugin.
How to do it…
This is a pretty quick process. First, we’ll have to install the plugin.
- In the WordPress admin, click on the Plugins menu and then on Add New.
- Run a search for WooCommerce Extra Product Sorting Options.
- Install and activate the plugin.
Now that we’ve installed the plugin, we have to configure a few settings.
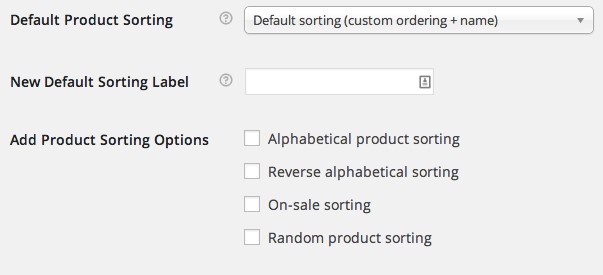
- From the WordPress admin, go to WooCommerce | Settings | Products | Display.
- The plugin gives you the ability to rename the default sorting option with the New Default Sorting Label field. You could name it as something more intuitive to the user; for example, Our Selection.
- Just beneath the New Default Sorting Label field, you’ll see the Add Product Sorting Options label and several checkboxes. Check as many as you like.
How it works…
This plugin uses a bunch of WooCommerce hooks to modify the default ordering. In the next recipe, we’ll write some code that interacts with these hooks.
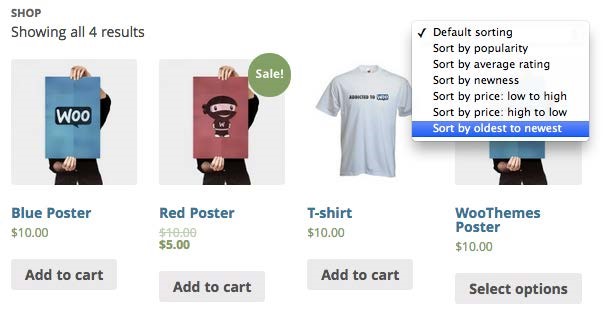
Sorting products from the oldest to the most recent
If the preceding recipe doesn’t give you enough options to sort your products, you can add custom code to meet your needs. With a bit of code, you can sort products from the oldest to the most recent.
How to do it…
We’ll need to add two pieces of custom code. The first piece of code will add an option to the sorting drop-down.
1. Add the following code at the bottom of your theme’s functions.php file under wpcontent/themes/your-theme-name/ or in your custom WooCommerce plugin:
// Add a new sorting option
add_filter( ‘woocommerce_default_catalog_orderby_options’,
‘woocommerce_cookbook_catalog_orderby’ ); add_filter( ‘woocommerce_catalog_orderby’, ‘woocommerce_cookbook_catalog_orderby’ );
function woocommerce_cookbook_catalog_orderby( $sortby ) {
$sortby[‘oldest_to_newest’] = __( ‘Sort by oldest to newest’, ‘woocommerce’ ); return $sortby; }
This code should add a new option to the sorting drop-down.
Unfortunately, WooCommerce doesn’t know what to do with that value. We still need to add a bit more code to tell WooCommerce exactly how to process that information.
2. Add the following code beneath the code you pasted in the preceding step:
// Add sorting oldest to newest functionality to sorting dropdown add_filter( ‘woocommerce_get_catalog_ordering_args’, ‘woocommerce_cookbook_get_catalog_ordering_args’ ); function woocommerce_cookbook_get_catalog_ordering_args(
$args ) {
// get the orderby value
$orderby_value = isset( $_GET[‘orderby’] ) ? wc_clean(
$_GET[‘orderby’] ) : apply_filters(
‘woocommerce_default_catalog_orderby’, get_option(
‘woocommerce_default_catalog_orderby’ ) );
// if the orderby value matches our custom option if ( ‘oldest_to_newest’ == $orderby_value ) {
$args[‘orderby’] = ‘date’; $args[‘order’] = ‘ASC’;
}
return $args; }
3. Save the file and upload it to your site.
Now, if you click on the new option, which we created in the preceding code from the sorting drop-down, the page will reload and the items will be rearranged according to the new order.
How it works…
The actual functionality happens in the woocommerce_cookbook_get_catalog_ ordering_args function. In there, we determine the $orderby_value, which is basically checking which option is set in the drop-down. After we have the value selected, we check whether that’s our custom option. If it is our custom option, then we change the sort order.
There’s more…
In the code we pasted in, you’ll notice the $args array with two keys: orderby and order. A developer can change the values in that array to implement any custom sort order.
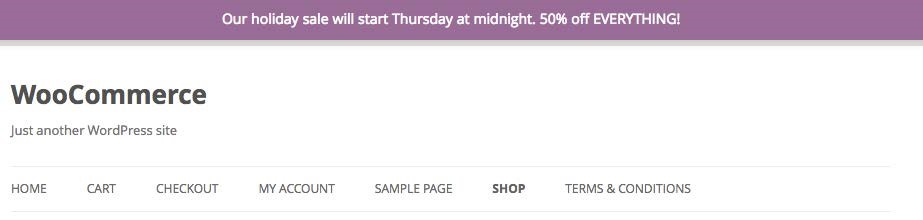
Adding a site-wide notice
There may be times when you have something you need every customer to see. Maybe you’re having a limited-time sale, a problem with your contact page, or you just announced an awesome new product. For these types of situations, WooCommerce includes a setting to enable a site-wide notice.
How to do it…
To add a site-wide notice, perform the following steps:
- From the WordPress admin, go to WooCommerce | Settings.
- Check the Store Notice checkbox that can be found under the General Options heading.
- Once you check the box, you’ll see a Store Notice Text field appear. Fill this in with any content you want.
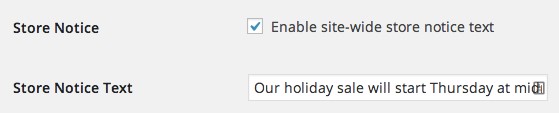
- Click on the Save changes button at the bottom of the page.
- Visit your site and see the notice.
There’s more…
If you need a bit more control over the notice, there are several free notice plugins on the WordPress.org repository. The Simple Notices plugin has a bit more flexibility with color choices and has title and description fields.
There is also the WooCommerce Cart Notices plugin, which adds notices depending on what’s in the user’s cart. We take a look at this plugin in the Adding banners to remind customers of upgrades recipe in Chapter 7, Modifying the Checkout Process.
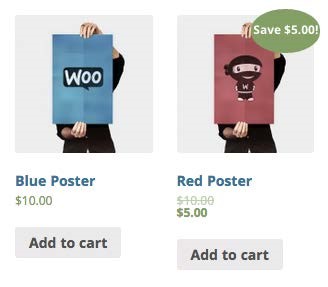
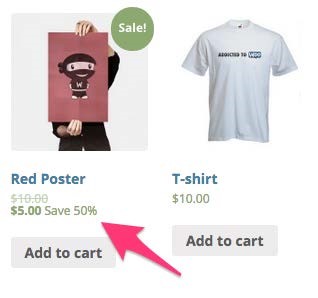
| Displaying the amount saved for on-sale |
| products |
WooCommerce will automatically add a sale badge to any products on-sale. That way, a customer browsing your store will be able to see at a glance which products are on-sale. If you have a store that has sales pretty often or where some products have a big discount and others have a small discount, you might want to give the customer more information. Replacing the sale badge with a badge that shows the discount amount can be really useful in these situations.
Getting ready
Make sure you have a product in your store that’s on-sale. This can be set in the Sale Price field in the Product Data panel on the Edit Product screen in the WordPress admin.
How to do it…
There’s a plugin that will do all of this for us. There aren’t any settings to be configured. Just install and activate the plugin and it’s done.
- In the WordPress admin, click on the Plugins menu and then on Add New.
- Run a search for WooCommerce Smart Sale Badge.
- Install and activate the plugin.
- Take a look at the frontend of your site and view a product that’s on sale.
If your sale badge doesn’t look like mine or you don’t see it at all, that’s most likely something controlled in your theme. You can reach out to the theme developer for assistance or, if you’re familiar with HTML and CSS, you can try styling it yourself.
There’s more…
If you want to display percentages instead of an absolute dollar amount, we’ll cover that in the next recipe.
| Displaying the amount saved as a |
| percentage |
With higher ticket items, it’s sometimes nice to show the customer the percentage saved versus the dollar amount. With two pieces of code, we can change this functionality.
Getting ready
Make sure you have a product in your store that’s on sale.
How to do it…
Currently, the only way to do display the amount saved in a percentage is with a bit of custom code. You have to add the percentage saved to the HTML. This can be done with two small snippets.
- In your code editor, open up your theme’s functions.php file, located under wpcontent/themes/your-theme-name/, or your custom WooCommerce plugin.
- Add the following code to the bottom of that file:
// calculate the percentage saved.
function woocommerce_cookbook_calculate_percentage_saved(
$product ) {
return round( ( ( $product->get_regular_price() –
$product->get_sale_price() ) / $product-
>get_regular_price() ) * 100 );
}
This piece of code calculates the percentage saved. Now we need to write a bit more code that will hook into the right part of the WooCommerce page and replace the default sale price with our new sale price, including the percentage saved.
- Add the following code to the bottom of your file:
// Add percentage saved next to sale price add_filter( ‘woocommerce_sale_price_html’,
‘woocommerce_cookbook_percentage_saved’, 10, 2 ); function woocommerce_cookbook_percentage_saved( $price,
$product ) {
$percentage_saved =
woocommerce_cookbook_calculate_percentage_saved( $product
);
return $price . sprintf( __( ‘ Save %s’, ‘woocommerce’
), $percentage_saved . ‘%’ );
}
- Save the file and upload it to your site.
- You should now see the percentage saved where the sale price used to be.
There’s more…
This recipe and the previous one both changed how the sale price was displayed. As you can see, they can be done in very different ways. A developer could combine these methods and get the best from both worlds. If you’re looking to get started with customizing your WooCommerce site but don’t know where to start, a good place would be the WooCommerce templates located in the /templates/ folder in the WooCommerce plugin. You can see all of the hooks used to display various pieces of functionality.
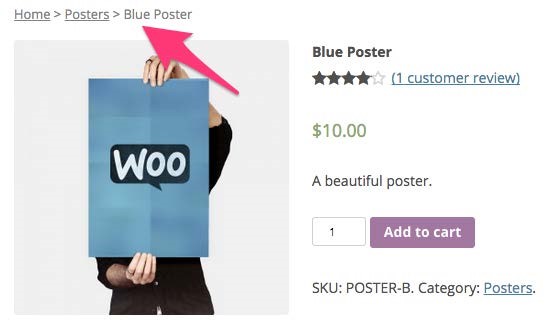
Changing the breadcrumb separator
One of the really useful features built into WooCommerce allows the customer to see where they are in the store and then click on a link and go back to a previously visited page. In the programming world, these are called breadcrumbs.
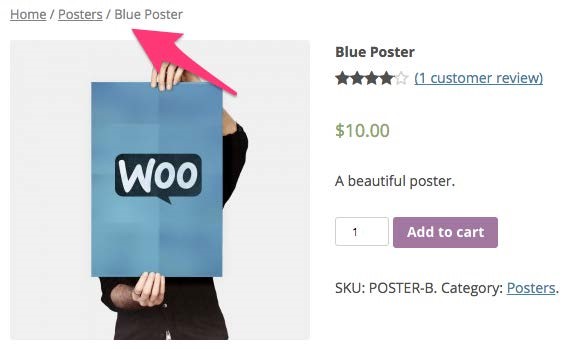
There are several hooks you can use to customize the breadcrumbs to your liking. We’ll be using a little code snippet to change what the actual code looks like.
Getting ready
Make sure you have a product in your store and that it’s in a product category. That way, you can see the breadcrumbs.
How to do it…
We’ll need a little snippet of code to change the breadcrumb separator. We will also need to look up the HTML entity for the character we want to use. If you don’t know what an HTML entity is, that’s fine. Just know that certain characters (such as <, >, &, ©, and others) can’t always be used directly in code. Sometimes, you need to help the computer translate those symbols. First, let’s add the function we need.
1. Add the following code to your theme’s functions.php file, located under wpcontent/themes/your-theme-name/, or your custom WooCommerce plugin:
// Change the breadcrumb delimeter from ‘/’ to ‘>’ add_filter( ‘woocommerce_breadcrumb_defaults’, ‘woocommerce_cookbook_breadcrumb_delimiter’ ); function woocommerce_cookbook_breadcrumb_delimiter(
$defaults ) {
}
At this point, we have a function, but it’s not doing anything. We need to add a bit of logic to the function. Before we do that, we need to know the HTML entity of the character we want to use. We’ll be using the > character. A quick Google search will reveal that the HTML entity for the > character is >. Optionally, you can use a
website such as http://www.w3schools.com/html/html_entities.asp to
find the HTML entity you need. Now that we have the value we need, we put it in our function.
- In the woocommerce_cookbook_breadcrumb_delimiter function, we just add the following code right after the beginning of the function:
$defaults[‘delimiter’] = ‘ > ’; return $defaults;
- Save your file and upload it to your site. You should see a new separator in your breadcrumbs.
There’s more…
There are plenty of other breadcrumb settings we haven’t covered. A useful free plugin that allows you to customize all of this without code is called WooCommerce Breadcrumbs. If you need more control, I’d advise you to use that plugin.