
Modifying the Checkout Process
In this chapter, we will cover:
Adding a Terms & Conditions page Opening the Terms & Conditions page in a pop-up Adding a newsletter signup to the checkout page Adding or removing checkout fields Modifying the image size of related products Adding an Empty Cart button to the cart page Hiding all checkout fields for virtual products Adding banners to remind customers of upgrades Hiding the Coupon field Skipping the cart and going straight to checkout Creating a one-page checkout Adding a default country and state to the checkout page
Introduction
With all of your products in your store, shipping methods set, and payment methods configured, you’re all set to accept orders via your store. If you have a bit more energy, you can take your store to the next level and customize your checkout process to make the experience more enjoyable, get more conversions, and increase profits.
For smaller stores that may only offer a few products, you can simplify the experience to get the user through the checkout process as quickly as possible. For larger stores, we can discover related products and upsell the customer in the checkout.
There’s a recipe that will let the customer opt in to your newsletter, which is one of the best ways to maintain contact with your customers and remind them to return to your store.
There are plenty of recipes that will minimize the number of steps to purchase your products. If you don’t offer coupons, you can hide the coupon fields and prevent your customers from abandoning your store in search of coupons. For stores offering a single product, there is a One Page Checkout plugin that allows you to create an entire e-commerce experience on one page.
At the end of this chapter, you should be able to customize the checkout however you like, depending on your store’s needs.
Adding a Terms & Conditions page
It doesn’t matter what type of product you sell; there are most likely terms and conditions you would like your customers to be aware of before they check out. These could include your return policy, the software license, or your privacy policy. You could, of course, create a regular WordPress page and add a link in your menu, but that doesn’t guarantee that anyone will actually read it.
WooCommerce has a nice feature—a checkbox with a link to the Terms & Conditions page on the checkout page. This forces the user to check that box before completing the transaction. This gives you some assurance that the user actually reads your terms before the purchase and will help you enforce them.
How to do it…
There are two steps to make sure users see your Terms & Conditions page in the checkout. The first stage is to create a regular WordPress page. Perform the following steps:
- From the WordPress admin, go to Pages | Add New.
- Enter a title for the page.
- Enter the content for the page.
It’s pretty common for businesses to use PDFs or Word documents to pass around information. It is easy to upload those documents directly to your site and just link to them, but it’s worth the extra time to pull the content out of those documents and paste it right into the Terms & Conditions page. It will make it much easier for your users to read.
- Click on Publish.
Now that we have a page with the terms and conditions, we have to tell WooCommerce which page that is. Let’s take a look at the following steps:
- From the WordPress admin, go to WooCommerce | Settings | Checkout.
- Click on the Terms and Conditions drop-down and select your Terms & Conditions page.
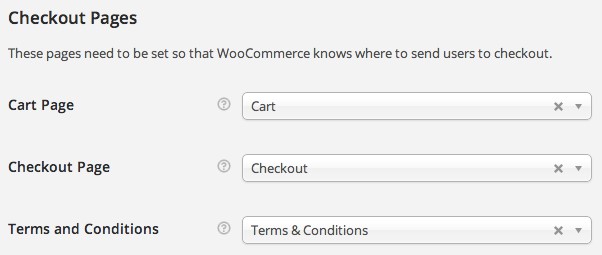
- Click on Save changes.
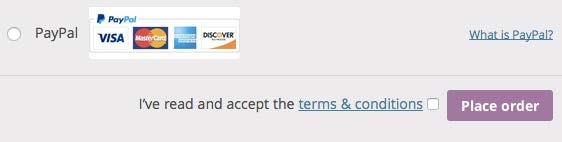
Now the user will see a checkbox with a link to the Terms & Conditions page before the Place order button.
There’s more…
If you have multiple Terms and Conditions pages, it’s best to link to all of them from the main Terms and Conditions page that you set in WooCommerce.
| Opening the Terms & Conditions page in a |
| pop-up |
One of the secrets to improving your conversion rates is removing everything that isn’t essential to the checkout process to keep the user on track. We can improve the checkout experience so that, when the user opens the Terms & Conditions page, it will open in a pop-up. There won’t be anything that can distract them, and the only thing they can do is close the window. This should improve your conversion rates.
These distractions were a pain that I felt while using WooCommerce stores, so I built the plugin that we’re going to be using in this recipe.
Getting ready
You’ll need the WooCommerce Terms and Conditions Popup plugin (available on WooThemes. com) installed and activated on your store. You’ll also need to have a Terms & Conditions page set in WooCommerce. See the preceding recipe for more details.
How to do it…
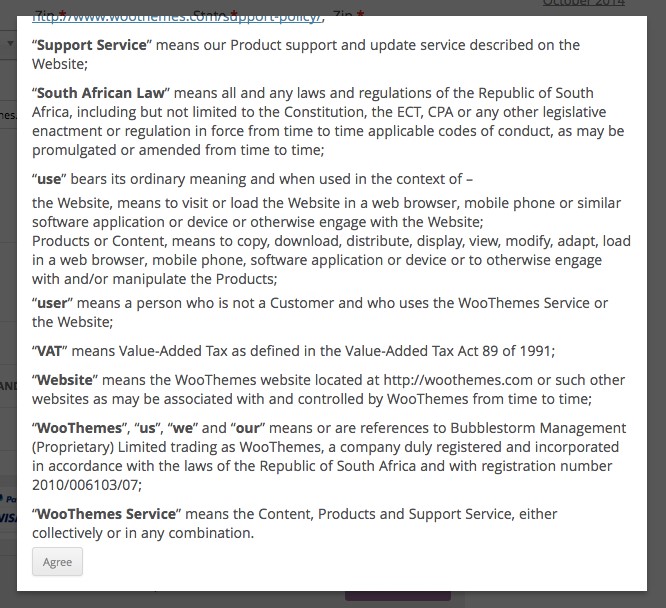
You don’t actually have to do anything. This plugin does just one thing and it does it very well. Just by activating the plugin, your Terms & Conditions page will automatically open in a pop-up.
There is one setting we can tweak to make the experience a bit better. By default, the plugin will just load a pop-up that the user can read and then click off to dismiss it. I think it’s a better experience to put an Agree button at the bottom of the page. Let’s take a look at the following steps:
- From the WordPress admin, go to WooCommerce | Settings | Checkout.
- Check the Add “Agree” button setting.

- Click on Save changes.
Now the user will have to scroll down to the bottom of the pop-up and click on the Agree button. This will close the pop-up and check the box for the user.
There’s more…
Many people have a Terms and Conditions page to protect themselves in case of litigation. If you wish to be thorough and have a record of each customer agreeing to the Terms and Conditions, there is a tutorial by Remi Corson on how to do this at http://www. remicorson.com/storing-woocommerce-terms-conditions-in-the-database/.
| Adding a newsletter signup to the |
| checkout page |
One way to improve how much revenue your store can bring in is to reach out to customers who have already bought something from you. It takes far less energy to get people who have already bought from you to buy a product than it takes to get a new person who hasn’t ever heard about you to do the same. Don’t forget about your older customers. You should be regularly reaching out to them and letting them know about new products and deals on existing products.
One of the best ways to maintain communication with your existing customers is to let them opt in to your newsletter. You might already have a newsletter signup somewhere on your site, but you might as well offer it to anyone who is going to checkout. Doing so during the checkout process is relatively painless since you’re already collecting all of their information. You only need to add a checkbox to the checkout to let the user opt in. The programming will do the rest.
Getting ready
You’ll need the Newsletter Subscription plugin (available on WooThemes.com) installed and activated on your site.
You’ll also need to either create a Campaign Monitor or MailChimp account. MailChimp is well known and respected in the web community. They offer a free plan up to 2,000 subscribers, so I recommend setting up a MailChimp account.
How to do it…
In order to add a newsletter signup to the checkout page, take a look at the following steps:
- From the WordPress admin, go to WooCommerce | Settings | Newsletter.
- Choose your service provider from the drop-down (either MailChimp or Campaign Monitor).
You can change the default Checkbox status to Checked, but I don’t recommend it. There isn’t much point having a big newsletter list if people aren’t interested. As your newsletter list gets bigger (2,000+), you’ll have to start paying a monthly fee. It’s better to let people opt in and create a highly focused and interested list.
- Enter your API key in the API Key box. You’ll need to log in to your MailChimp or Campaign Monitor account and get your API key. The link next to the setting will take you directly to the API page in your account.

- Click on Save changes.
This will save the page and will also load your newsletter lists in your account. If you don’t see any lists, you either haven’t created any or you have entered incorrect API information. Let’s move on by finally signing up for the newsletter.
- Once the page refreshes, select your newsletter list.
If you’re using MailChimp, you’ll have one extra setting, Enable Double Opt-in. This will send an e-mail to the address provided, asking them to confirm they want to join the newsletter. This prevents users from entering a dummy e-mail address and filling up your list. I highly recommend leaving this option on.
- Click on Save changes.
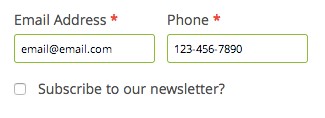
You should now see the ability to opt in to your newsletter on the checkout page.
There’s more…
There are dozens, possibly hundreds, of newsletter providers. If you use services such as AWeber, Constant Contact, Mad Mimi, or MailPoet, there are extensions for those services available on WooThemes.com. They have very similar settings pages.
Adding or removing checkout fields
One of the things that WooCommerce excels at is customization. With other platforms, the checkout experience is completely locked down. There’s no way you can ask for more information from the customer and no way to remove unnecessary fields. With WooCommerce, we give that power to the store owners and instead prevent them from deleting the essential fields.
As a store owner, you may want to know how people found your site. Did they do a Google search, were they referred by a friend, or did they find you through social media? Those answers could affect how you choose to market your business. Adding a How did you hear about us? field to the checkout is pretty painless with the Checkout Field Editor plugin.
Getting ready
You’ll need the Checkout Field Editor plugin (available on WooThemes.com) installed and activated on your site.
How to do it…
The Checkout Field Editor plugin gives us additional settings we can tweak to change checkout fields and how they behave. We need to navigate to the right-hand side checkout field area and then add our field. Let’s take a look at the following steps:
- From the WordPress admin, go to WooCommerce | Checkout Fields.
At this point, you’ll see the list of billing fields, and a set of tabs along the top of the page. You can choose to put the field under the Billing section, the Shipping section, or the Additional Fields section. For most use cases, I suggest putting the additional fields in the Additional Fields section. That way, if there’s another plugin that modifies the billing or shipping fields, your custom field should be unaffected.
- Click on Additional Fields.
- Click on + Add field.
- Enter a name for the field. The name is only used in the code and won’t be displayed to the end user. I’ll name my field hear_about_us.
- Now select the type of field you want to add. In our case, we want to give the user a list of options and we’re going to choose the Select type.
If you want to give a user a set of options, it’s best to use either the Select, Multiselect, or Radio option. The Radio option works well enough, but needs a bit of fiddling to make it look like it fits into the checkout experience. If you don’t mind tinkering with CSS, use radio buttons. If you don’t want to touch the CSS, the Select or Multiselect option is your best bet. The Select field is a drop-down that allows the user to select one option. The Multiselect field is the same thing but allows them to select multiple options.
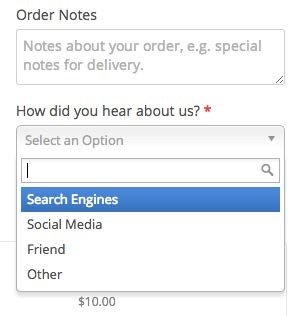
- Now enter a label for the field. This is visible to the user. We’ll enter How did you hear about us?.
- Now we need to enter the possible values a user can select. Put those values in the Placeholder / Option Values field. Each value should be separated by a pipe character ( | ).
With the Select box, it’s a good idea to start the list of values with an extra pipe character. This will create a blank option so the Default dropdown option will be blank. Otherwise, the Default option will be the first value and users might just skip the field.
- To make the field look as good as possible, I recommend setting the Position setting to Full-width.
- You can optionally make the field Required by selecting that option from the Validation Rules field.
- Click on Save Changes.
Your saved field settings should look something like this:

And, on the frontend, your field should look something like this, depending on your theme:
There’s more…
You can, of course, also use this plugin to remove or edit existing fields. The plugin will prevent you from editing anything critical, but it’s always a good idea to test your checkout after any changes to make sure that it still works smoothly.
You can use more than just radio buttons and select boxes. You can also add text boxes, text areas, checkboxes, password fields, and date pickers.
Modifying the image size of related products
Built right into WooCommerce is the ability to cross-sell and upsell products. By cross-selling and upselling your products, you can very easily increase your average order value.
Cross-sells are products that work well together (such as peanut butter and jelly). Crosssells appear on the cart page to get the customer to buy more products. Upsells are similar products where you want the customer to buy the more expensive option, for example, a generic version of peanut butter upselling a well-known and popular brand of peanut butter. These appear on the Product page.
The one adjustment I’d made to the WooCommerce cross-sell is to make it a bit bigger. If you’re going to cross-sell something, you should make sure it’s big enough to catch the customer’s eye on the cart page.
Getting ready
You’ll need to have at least two products in your store.
How to do it…
The first step is to configure one product to cross-sell the other product. Once the product is set up, we can customize the cart page. Let’s take a look at the following steps:
- In the WordPress admin, click on Products and navigate to one of your products.
- Scroll down to the Product Data panel.
- Click on Linked Products.
- Enter the product you wish to cross-sell in the Cross-Sells field.
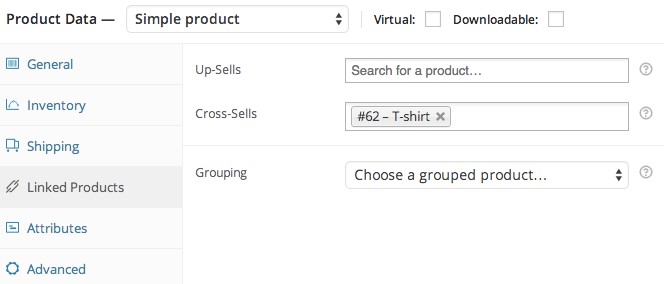
- Click on Update.
Now that the cross-sell is set, we can take a look at how it’s displayed on the frontend of the site.
- Go to the frontend of your site.
- Add the product to your cart.
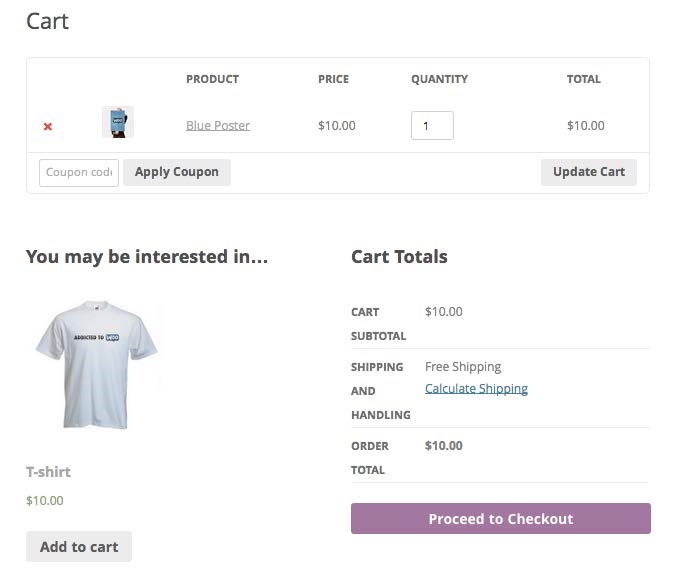
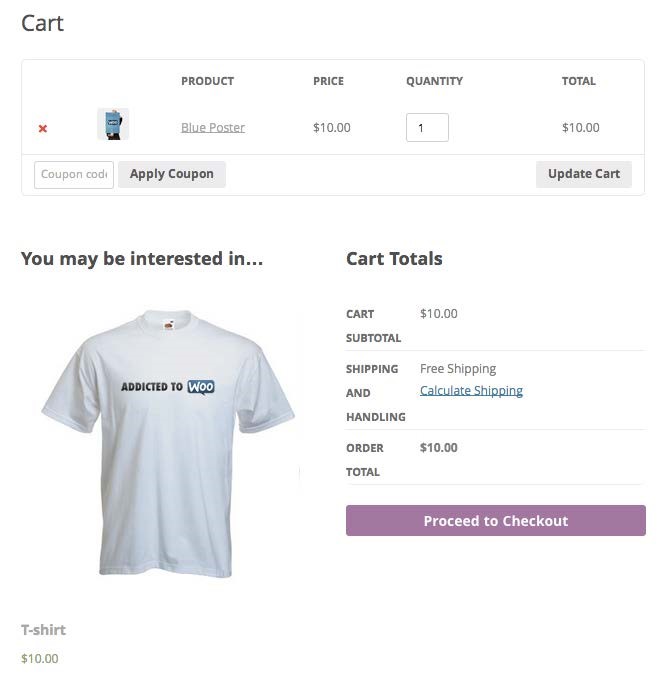
The cross-sell is definitely visible. There’s enough space for two cross-sells, but you may prefer to have a really big image and try harder to sell one product.
To make this more visible, we’ll have to do three different things via code: increase the size of the product image, add some CSS to display the image in as large a way as possible, and force the page to only display one cross-sell. Add the following code to the bottom of your theme’s functions.php file or create a custom plugin:
1. First, we need to increase the size of the product image. We have to remove the existing programming (that’s the remove_action line) and then add our own custom programming (that’s the add_action line). The add_action line at the very bottom gets the whole thing running. Carry out the following code:
function woocommerce_cookbook_big_upsell_image() { if ( class_exists( ‘WooCommerce’ ) && function_exists(
‘woocommerce_get_product_thumbnail’ ) ) { if ( is_cart() ) { remove_action(
‘woocommerce_before_shop_loop_item_title’,
‘woocommerce_template_loop_product_thumbnail’, 10 ); add_action(
‘woocommerce_before_shop_loop_item_title’,
‘woocommerce_cookbook_product_thumbnail’, 10 );
}
}
}
// get a bigger version of the product thumbnail. function woocommerce_cookbook_product_thumbnail() { echo woocommerce_get_product_thumbnail( ‘large’ ); echo woocommerce_cookbook_product_thumbnail_css();
}
add_action( ‘woocommerce_before_shop_loop_item_title’, ‘woocommerce_cookbook_big_upsell_image’, 0 );
- Below the preceding code shown here, paste in the following. This code will make sure that the item is displayed at its full width:
function woocommerce_cookbook_product_thumbnail_css() { echo ‘<style>
.woocommerce .cart-collaterals .cross-sells ul.products li, .woocommerce-page .cart-collaterals .cross- sells ul.products li{ width: 100%;
}
</style>’;
}
- Lastly, we need to make sure that we only display one cross-sell on the page. Two big cross-sells would look bad. Add the following code beneath the rest:
add_filter( ‘woocommerce_cross_sells_total’, ‘woocommerce_cookbook_cross_sells_total’, 10 ); function woocommerce_cookbook_cross_sells_total( $total ) { return 1; }
- Save and upload your file.
You should now see just one big cross-sell image on the cart page.
There’s more…
For the sake of simplicity, in this tutorial I wrote the CSS inline. This isn’t necessarily a best practice. If you wanted to make this code a bit prettier, you could take that CSS, put it in a style sheet, and enqueue the style sheet with wp_enqueue_style.
Rather than having to manually set which products are related to each other, there’s a service called Graphflow that does this for you. They use an algorithm to constantly revaluate which products you should recommend to which customers. They have a free tier and a WooCommerce plugin. Find out more about the service and a link to their plugin at http://graphflow.com/.
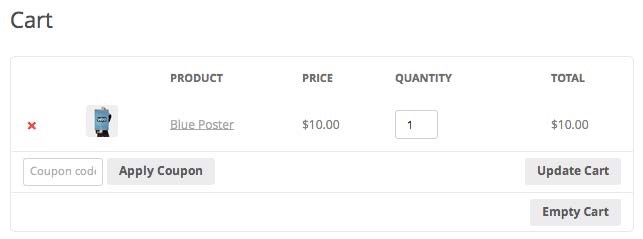
| Adding an Empty Cart button to the cart |
| page |
If you have the type of store where people are constantly comparing prices, adding products to their cart, removing them, and then starting all over again, it might be worth your while to add in an Empty Cart button.
WooThemes keeps WooCommerce as light as possible. An empty cart button is useful to some stores but it takes up valuable space in other stores. For that reason, it isn’t included in WooCommerce. As with many other enhancements, there is a free plugin that can do this for us.
How to do it…
Adding the empty cart button is really simple. To get started, we need to add a plugin. Work through the following steps:
- In the WordPress admin, click on the Plugins menu and click on Add New.
- Look for the Woocommerce Empty Cart Button plugin.
- Install and activate the plugin.
And this is all we have to do. This plugin does just one thing and does it well. There aren’t any settings. The plugin adds the Empty Cart button and that’s it.
How it works…
This plugin adds some extra HTML to the list of products on the cart page. The plugin also contains a function that listens for a button push and then empties the cart.
There’s more…
If you want to style the Empty Cart button, it already has a class assigned to it. You can use the emptycart class.
| Hiding all checkout fields for virtual |
| products |
WooCommerce is pretty smart. If you only have virtual products such as memberships or downloadable products in the cart, WooCommerce won’t ask for any shipping information. But some people want to take this a step further. They don’t want all of the billing details—they only want the bare minimum information.
WooCommerce doesn’t automatically remove these fields because some payment gateways require more billing information. If your payment gateway doesn’t require billing details, then you could do this and make the checkout process a bit smoother. The best way to find out if your payment gateway allows this is to try the following code snippet and do a test purchase.
How to do it…
We’ll have to add some code to our functions.php file in our theme or create a custom WooCommerce plugin.
- At the bottom of your theme’s functions.php file, add the following code to change the checkout fields that are displayed to the user:
// Remove unnecessary checkout fields add_filter( ‘woocommerce_checkout_fields’ , ‘woocommerce_cookbook_remove_checkout_fields’ );
- The code here calls a function, but we haven’t written it yet. We now need to write the function that alters the checkout fields. Add the following to the bottom of the file:
// remove unnecessary checkout fields function function woocommerce_cookbook_remove_checkout_fields(
$fields ) {
// check if the cart needs shipping if ( false == WC()->cart->needs_shipping() ) {
// hide the billing fields unset($fields[‘billing’][‘billing_company’]); unset($fields[‘billing’][‘billing_address_1’]); unset($fields[‘billing’][‘billing_address_2’]); unset($fields[‘billing’][‘billing_city’]); unset($fields[‘billing’][‘billing_postcode’]); unset($fields[‘billing’][‘billing_country’]); unset($fields[‘billing’][‘billing_state’]); unset($fields[‘billing’][‘billing_phone’]); // hide the additional information section
add_filter( ‘woocommerce_enable_order_notes_field’,
‘__return_false’ );
}
return $fields; }
3. Save the file and upload it to your site.
Now, when the cart contains exclusively virtual products, you should only see the name and e-mail fields.
How it works…
This code only does one thing—it checks to see if the cart requires shipping and then it unsets the unnecessary fields. You could remove some of those unset lines to keep some fields (for example, the phone field) if you need them.
There’s more…
A word of caution about removing checkout fields: the more information you can give the payment gateway, the easier it is for them to determine if purchases are legitimate. You could have an increase in fraud if you don’t ask for billing details such as country, state, postcode, and so on. If you do have an increase in fraud, start adding the fields back in or use a payment gateway such as Pay With Amazon, which uses billing information that’s already been verified on their end.
| Adding banners to remind customers of |
| upgrades |
There are a number of rewards and discounts that you could offer to your customers. Maybe you unlock free shipping at $100 or you give the customer a 5% discount at $200. Unless you use a lot of screen real estate to promote these rewards, most customers won’t know about them or act on them. One way around this would be to list the different rewards and how close the customer is to reaching them. If you have good rewards, people will buy more products to reach the reward. This can drastically increase your average order value.
Getting ready
Set up free shipping so that it’s unlockable at $100. This is covered in Chapter 5, Setting Up Shipping Methods. You will also need to install and activate the Cart Notices plugin, available on WooThemes.com.
How to do it…
In order to add a banner to remind your customers of upgrades, refer to the following steps:
- Go to WooCommerce | Cart Notices.
From here, we can see all of the cart notices on the site. We can also see a list of short codes we could use to display the cart notices on other pages on the site.
- Click on New Notice.
- Select the Type of notice you want to create. We want to create a Minimum Amount notice.
If you want to know how each notice works, you can select the type and some helper text will appear beneath the field, describing how it works.
- Enter a name for the notice. This is only for your reference, so put whatever makes sense. Since we’re creating a notice about free shipping, I’m going to call mine Free Shipping.
- Make sure the Enabled checkbox is checked.
If you want to pause a promotion or create one in advance, uncheck the Enabled checkbox.
- Enter the message you want to display to customers in the Notice Message setting. The default message is perfect for our use case.
- If you have a page describing the free shipping reward, you can add a button that links to the page by filling in the Call to Action and Call to Action URL fields.
- Enter $100 in the Minimum Order Amount field.
- Click on Create Cart Notice to save your settings.
If you add a product to your cart, it will look something like the following on the cart page:
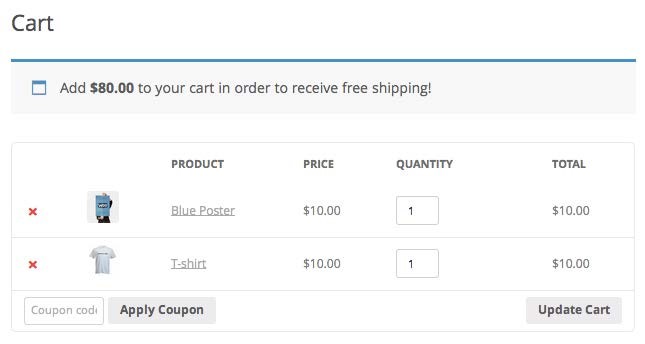
And if you hit the minimum order amount, the message disappears.
There’s more…
This plugin is very powerful. You can also recommend that users buy certain items in bundles, or let them know that, if they order on the weekend their packages won’t ship until Monday; alternatively, if a certain product is in the cart, you can have them read your review of a related product. You can create as many notices as you like.
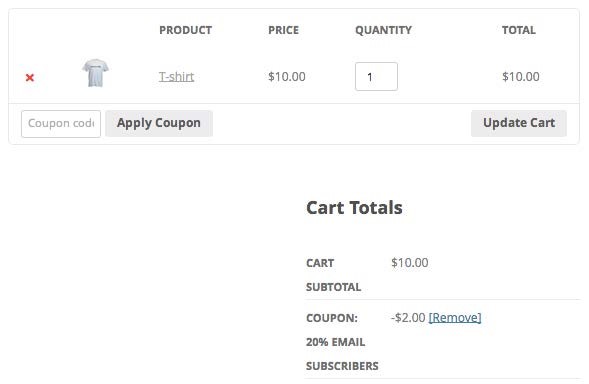
Hiding the Coupon field
There are several studies that show that having a coupon field in your checkout process can actually lower conversion rates. When people see a coupon field, they assume they can find a coupon somewhere online and they’ll leave your site looking for a coupon. It’s better to hide the field and give your special customers a discount another way.
Using URL Coupons, we can share special URLs like http://mysite.com/holiday2015 to give people a special discount. These URLs could be shared on your newsletter, via social media, on business cards, or even mentioned on podcasts.
Getting ready
You will also need to install and activate the URL Coupons plugin, available on WooThemes.com.
How to do it…
We’ll be creating a WooCommerce coupon, configuring a few extra settings, and then hiding the coupon field on the cart and checkout pages. Let’s take a look at the following steps:
- Go to WooCommerce | Coupons.
- Click on Add Coupon.
- Name the coupon. For normal coupons, customers have to type in the name, so you want to avoid spaces or weird characters. With URL coupons, you don’t need to worry about that—feel free to name it anything you like.
- Set the Discount type and Coupon amount fields as you would any other coupon.
- In the Unique URL field, add the URL you wish to add on to your main site. If you have a holiday special, then you might want to enter holiday2015. The full URL that someone would have to type in would be http://mysite.com/holiday2015.
Let’s take a look at the following screenshot that illustrates the usual coupon settings page with a few extra settings provided by the URL Coupons extension:
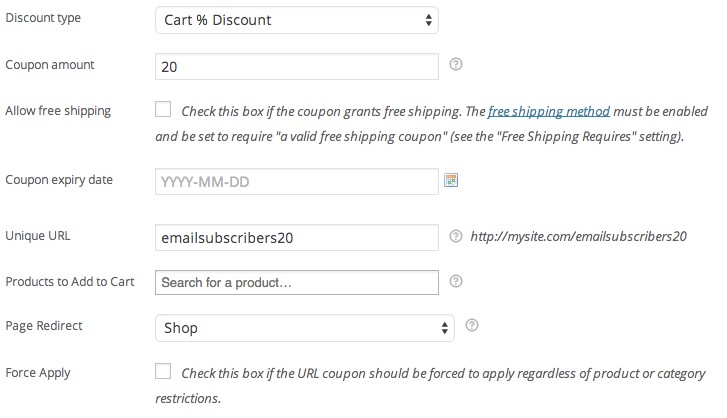
If you want to have a promotional page that describes the promotion the user just unlocked, then you should first create a WordPress page and enter the URL for that page. If you just want to direct the user to your shop, then you’ll have to set the Page Redirect setting.
- Click on Publish.
When the user visits the page, they’ll see a banner saying the coupon code was applied successfully and they’ll see the coupon details on the cart page.
Now that we have set up the URL coupons, we can disable the regular Coupon field. Implement the following steps:
- From the WordPress admin, go to WooCommerce | Settings | Checkout.
- You’ll notice that there are a few new settings on this page related to coupons. Enable both Hide on cart page and Hide on checkout page.
- Click on Save changes.
There’s more…
You can do a lot with this plugin. If you have coupons that apply to certain products, you can configure the coupon to automatically add those products to the cart and then redirect the user to the cart. It makes the whole experience very quick and easy for the user.
| Skipping the cart and going straight to |
| checkout |
This recipe will be useful for you if you have the type of store where most people only buy one product and thus the cart isn’t very useful. In such cases, you might want to remove the cart altogether and have the customer skip the cart page and go straight to the checkout.
We have covered a similar recipe, Making the Add to Cart button go straight to the checkout page, in Chapter 3, Changing the Product Organization, which uses a plugin instead of code.
Getting ready
In the WordPress admin, you need to make sure the Redirect to the cart page after successsful addition option under WooCommerce | Settings | Products | Display is checked.
How to do it…
We’ll be writing a bit of code to change the page that a customer lands on after adding a product to the cart. You’ll want to put this in either your theme’s functions.php file or in a custom plugin. Let’s take a look at the following steps:
- Open either your theme’s functions.php file or a custom plugin file.
- At the bottom of the file, add the following code:
// make the add to cart redirect go to the checkout page function woocommerce_cookbook_add_to_cart_redirect() { return get_permalink( wc_get_page_id( ‘checkout’ ) );
}
add_filter( ‘woocommerce_add_to_cart_redirect’, ‘woocommerce_cookbook_add_to_cart_redirect’ );
- Save the file and upload it to your site.
How it works…
This code doesn’t replace the cart page entirely. It just skips the cart page when a product is added to the cart. A user can still access the cart if it’s in your menu or if they type in the direct URL. This could be ideal, because some people will want to return to their cart after leaving the site.
There’s more…
We used the wc_get_page_id( ‘checkout’ ) line to select the checkout page. You could use that same function to get the link to any WooCommerce page and the user would be directed to that page. To see the other WooCommerce pages you can access with that function, view the documentation for that function at http://docs.woothemes.com/ wc-apidocs/function-wc_get_page_id.html.
Creating a one-page checkout
WooCommerce was designed as a full-fledged e-commerce platform. Even if you use all of the features, there may be times where you want to have a special promotion and you don’t need the full cart. For these times, there is the WooCommerce One Page Checkout extension, which can turn any page into a checkout page for a product or set of products. This is the perfect landing page for those store owners who use their newsletters to send out promotions; it’s also good for people who want to have a custom checkout for some of their products.
Getting ready
You can create a one-page checkout with one product, but this recipe will show you how to do it with two or more products. You should have two products for this recipe.
You’ll need the WooCommerce One Page Checkout plugin (available on WooThemes.com) installed and activated on your site.
How to do it…
We don’t actually need to change any checkout settings. The default checkout will work just fine. We actually do everything through regular WordPress pages and shortcodes. Let’s take a look at the following steps:
- From the WordPress admin, go to Pages | Add New.
- Enter a title for the page in the Title field.
- In the space where you would normally type in page content, note the new button that looks like a shopping cart.

- A pop-up will appear and you can start typing the names of your products in the Products field. An autocomplete field will help you select the exact product.
- Select Product Table as Template.
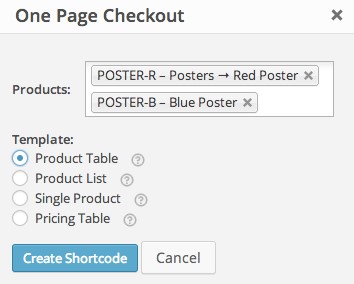
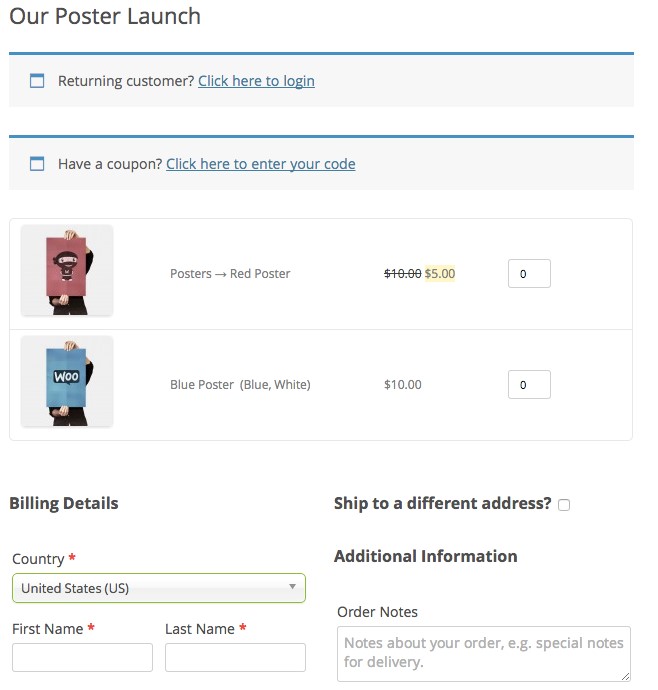
There are four different templates at the time of this writing, and all of them have their uses. Single Product is obviously good if you only offer one thing on this page. Pricing Table is great when you have very similar products with features you can list in a table. Product List is great for similar products that don’t need pictures and where the user can only select one option. Product Table is great for products that are different and where the user may want several different products.
- Click on Create Shortcode and you’ll notice that some text (called a shortcode) is automatically inserted in the content of the page.
- Feel free to add anything you like before or after that shortcode.
- Click on Publish.
On the frontend of your site, you should see a one-page checkout similar to this:
How it works…
The text you see on the page after clicking on Create Shortcode is what controls the programming. If you ever want to edit how the one-page checkout works, it would be best to go through the process of creating the shortcode again. A typo in the shortcode could break the programming, so be careful. Click on the shopping cart icon button, go through the steps, and create a new shortcode. Then delete your old one.
There’s more…
The WooCommerce One Page Checkout plugin integrates very nicely with the Easy Pricing Tables plugin mentioned in Chapter 4, Running a Membership Site.
| Adding a default country and state to the |
| checkout page |
If you are just starting out, you may not have a very wide reach, you may not have any international orders, and you might not even have orders from outside your state or province. If that’s the case, why make people type it in? With a touch of code, we can set some defaults that will help people get through the checkout process.
How to do it…
This code can either go in your theme’s functions.php file or in a custom WooCommerce plugin. Let’s take a look at the following steps:
- Open either your theme’s functions.php file or a custom plugin file.
- We’ll start by setting just the default country. At the bottom of the file, add the following code:
add_filter( ‘default_checkout_country’,
‘woocommerce_cookbook_default_checkout_country’ );
// change the default country to USA function woocommerce_cookbook_default_checkout_country() { return ‘US’; }
- If you also want to set a default state, you’ll have to add a bit more code. In the following code sample, I’ll set the default state to Colorado:
add_filter( ‘default_checkout_state’,
‘woocommerce_cookbook_default_checkout_state’ );
// change the default state to Colorado
function woocommerce_cookbook_default_checkout_state() { return ‘CO’; }
If you want to change the default country to something other than the US, you’ll have to find out the country’s two-letter code. A Google search will uncover this. If you want to change the default state to something other than Colorado, you’ll have to replace the two-letter state code of Colorado, CO, to your state code.
4. Save the file and upload it to your site.
Make sure you’re logged out of your site, add a product to your cart, and proceed to check out. You should see the state and country filled in by default.