
WooCommerce Theming
In this chapter, we will cover:
Declaring support for WooCommerce Displaying the accepted credit cards Adding a cart icon to the menu Overriding WooCommerce templates Using WooCommerce hooks Displaying an image on the category archive page Writing CSS to customize the Add to Cart button Creating a product slideshow Removing a product category from the Shop page
Introduction
With hosted e-commerce platforms, you’re limited to customizing the areas they let you customize. With a platform such as WooCommerce, which is open source, you can customize just about anything. Many themes have user-friendly controls for the most common customizations and, for the things that you can’t change via the admin area, you can change with code. Even if you can’t change something with code, there are many developers out there willing to do it.
There are many modifications you can make with plugins that are freely available, for example, displaying the credit cards you accept and adding a cart icon to the menu. And there are plenty of things you can change with code. You can override any of the WooCommerce templates, use the hooks built into WooCommerce to add extra programming, and do plenty of other things.
This chapter will focus on the code in rather more detail. Many users want to make their store reflect their brand and they like to customize every little detail. That’s why this chapter will emphasize the code—so that you can customize every detail as you like.
If you haven’t yet picked a theme for your e-commerce store, a great starting point is the
Storefront theme from WooThemes. It’s available for free on WordPress.org; go to https:// wordpress.org/themes/storefront/.
Declaring support for WooCommerce
If you’re developing a theme from scratch or if you’re using a theme that wasn’t designed to work with WooCommerce, you may see a notice on your site when you install WooCommerce. The following screenshot displays the theme-incompatibility message:

This message can be easily dismissed by clicking on Hide this notice but, if you’re planning on distributing this theme to others, then it’s nice to let people know you designed your theme to work with WooCommerce.
Getting ready
You’ll need to install a theme that shows the notice shown in the preceding screenshot. If your theme doesn’t show this notice, then it’s already declared support for WooCommerce and you can skip this recipe.
If you’re a theme developer, you may have heard of Underscores. This starter theme hasn’t declared support for WooCommerce, so if you base your theme on Underscores, you’ll need to declare support. See the Underscores website for more information at http:// underscores.me/.
How to do it…
Declaring that your theme supports WooCommerce takes a pretty small code snippet. We’ll add that code snippet to your theme’s functions.php file and then we’ll be done. In the following steps, we declare support for our WooCommerce theme:
- Open up your theme’s functions.php file in your code editor.
- Add the following code to the bottom of your functions.php file:
add_action( ‘after_setup_theme’, ‘woocommerce_coobook_support’ ); function woocommerce_coobook_support() { add_theme_support( ‘woocommerce’ ); }
- Save and upload the file.
How it works…
It’s worth noting that adding this code only hides the notice. It doesn’t automatically make your theme work with WooCommerce. You should go through all of the WooCommerce pages and make sure that everything looks correct.
Displaying the accepted credit cards
Every credit card has a different transaction fee. Many credit cards charge around 2 percent, but some cards such as American Express can charge 4 or 5 percent. For this reason, some retailers only accept certain cards through their payment gateway. If you don’t allow one of those cards, it’s best to tell the customer that ahead of time.
If you support every credit card, you still can show the customer a list of supported cards. They’ll be more likely to convert knowing that you support their credit card.
How to do it…
There is a plugin that does exactly this. It allows you to select exactly which cards you support. In the following steps, we install this plugin and display the list of cards accepted for payment purposes:
- In the WordPress admin, click on the Plugins menu and then on Add New.
- Run a search for the WooCommerce Accepted Payment Methods plugin.
- Install and activate the plugin.
Now that we have installed the plugin, we need to configure the settings.
- Go to WooCommerce | Settings | Checkout.
- Scroll down to the Accepted Payment Methods section.
- Check all of the credit cards that apply.
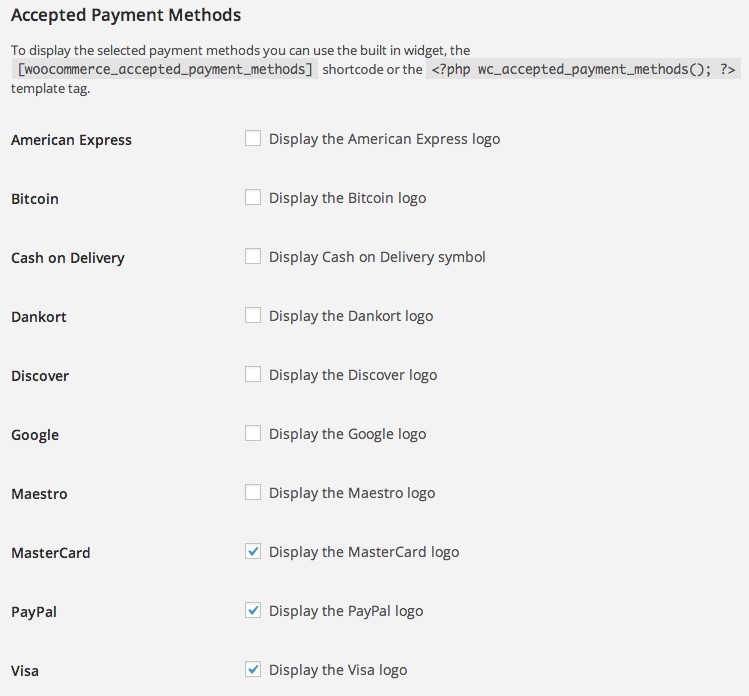
- Click on Save changes.
We’ve determined which credit cards we accept. Now we need to display that on the frontend. We’ll be doing this by using a widget that comes bundled with the WooCommerce Accepted Payment Methods plugin.
- From the WordPress admin, go to Appearance | Widgets.
- Click on WooCommerce Accepted Payments from the Available Widgets area and select the widget area where you would like to place it.
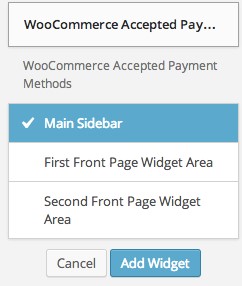
- Click on Add Widget.
- If you like, you can change the title of the widget.
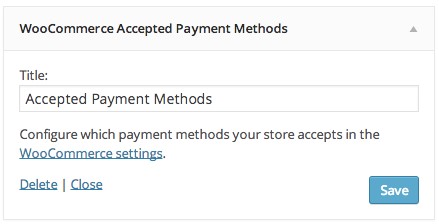
- Click on Save.
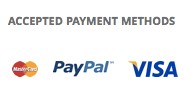
If you visit the frontend of your site, you should see the list of accepted payment methods.
There’s more…
Displaying the list of accepted payment methods in a widget is just one way to display them. You could also use a shortcode to display them on a page or a template tag to place it anywhere in your theme. You can find out the exact syntax by reading the WooCommerce Accepted Payment Methods plugin’s documentation on WordPress.org.
Adding a cart icon to the menu
Users like to be able to view both the number of items and the total value that they have in their cart. If you can display this information on every page, then users won’t have to constantly check the cart page. They should have to spend less time double-checking their numbers and get through your site quicker. This should improve your conversion rates.
Getting ready
Before we begin, you should have a menu already created in WordPress. We’ll be adding the cart icon to that menu.
How to do it…
The following steps demonstrate a plugin that allows you to add a cart icon to the menu and provides several options that you can customize:
- In the WordPress admin, click on the Plugins menu and then on Add New.
- Run a search for the WooCommerce Menu Cart plugin.
- Install and activate the plugin.
This plugin works for WooCommerce and other WordPress e-commerce platforms. That’s great, but it does mean that the settings are a bit harder to find.
- Go to Settings | Menu Cart Setup.
- Leave the Select which e-commerce plugin you would like Menu Cart to work with setting set to WooCommerce.
- Enter the menu you wish to add this cart to in the Select the menu(s) in which you want to display the Menu Cart field.
- You can optionally display the cart when it’s empty by checking the Always display cart, even if it’s empty field.
I’m not a fan of letting users make mistakes. Unless you have some sort of marketing promotion on the cart page or something else for users to do on that page, I recommend hiding the cart until they add something to it.
- Enable the cart icon by checking the Display shopping cart icon field.
- You can optionally change the alignment of the cart by choosing one of the options for the Select the alignment that looks best with your menu setting.
To make the cart icon easier to find, I recommend changing the alignment. So if your menu is aligned left, then align the cart icon to the right. It will stand out for the user, which will make it easier to understand.
- Click on Save Changes.
If you go to the frontend of your site and add a product to your cart, you should see the new cart icon in the menu.

There’s more…
If you want to make the cart icon even more noticeable, you can use CSS to style that menu item. You can apply CSS to the wpmenucartli class.
There is a pro version of this plugin available (as if you didn’t see all of the annoying promotions in the settings page). I haven’t personally felt the need for it, but there are more options if you need them.
Overriding WooCommerce templates
If you’ve ever wanted to change the layout of the single product page, the cart page, or even one of the e-mails sent out by WooCommerce, you can do that by overriding the templates in WooCommerce. If you’re familiar with WordPress theme templates, they are very similar. If you copy a WooCommerce template to your theme, WooCommerce will load your template instead of the default template that is in the plugin.
Being able to overload any template in WooCommerce means you can customize every aspect of how WooCommerce looks to your customers. If you want to remove something, change something, or add something new, that’s all possible.
For our purposes, we’ll be adding some CSS classes to the HTML. If we can reuse existing CSS classes that we’ve already styled, then that saves us a lot of time as we won’t need to rewrite those styles.
Getting ready
You need to have at least one product in your store.
How to do it…
Overriding WooCommerce templates is similar to using a child theme and overriding templates in the parent theme. The first step is to copy an existing file in the WooCommerce plugin to your theme. You can copy any file in the templates folder in WooCommerce to a woocommerce folder in your theme.
For example, you could copy woocommerce/templates/single-product.php to yourtheme/woocommerce/single-product.php. In the following steps, we discuss in more detail overriding the WooCommerce templates:
- Using your regular file browser, navigate to the WooCommerce plugin folder and copy templates/single-products/tabs/tabs.php to woocommerce/singleproducts/tabs/tabs.php within your theme.
- Using your code editor, open up the tabs.php file we just copied to your theme.
- Look for this line of code: <div class=”woocommerce-tabs”>.
This div element wraps around the tabs. We’re going to add a CSS class to that line to help style it.
- Add a blank space and append this line of code right after woocommerce-tabs: tabs-wrapper
- Save and upload the file.
How it works…
WooCommerce will run a search for any templates that you may have overridden and use those instead of the file that comes with the WooCommerce plugin. You could override one template or every single template if you wanted.
There’s more…
You can do just about anything to these files. We added a CSS class that will help with styling, but you could just as easily add or remove extra HTML, JavaScript, or PHP.
When you update to a new version of WooCommerce, make sure your templates still work. It’s rare, but sometimes templates need to be updated and, if you have out-of-date templates, something could break. You can check the status of your templates in the WordPress admin, under WooCommerce | System Status.
If you ever have out-of-date templates, copy the new files from the updated WooCommerce plugin to your theme and then modify the new files to include your old changes.
Using WooCommerce hooks
The ability to override WooCommerce templates is available to alter HTML and CSS. It isn’t terribly great when adding extra logic with PHP or rearranging different templates. Many of the templates are hooked in. What this means is that there is a placeholder in the template that will usually look similar to the following code:
/**
- woocommerce_single_product_summary hook
*
- @hooked woocommerce_template_single_title – 5
- @hooked woocommerce_template_single_rating – 10
- @hooked woocommerce_template_single_price – 10
- @hooked woocommerce_template_single_excerpt – 20
- @hooked woocommerce_template_single_add_to_cart – 30
- @hooked woocommerce_template_single_meta – 40
- @hooked woocommerce_template_single_sharing – 50
*/ do_action( ‘woocommerce_single_product_summary’ );
From the comments in the code, you can see where the developers have programmed certain pieces of functionality. However, they’re not easy to move unless you know how to use WordPress hooks.
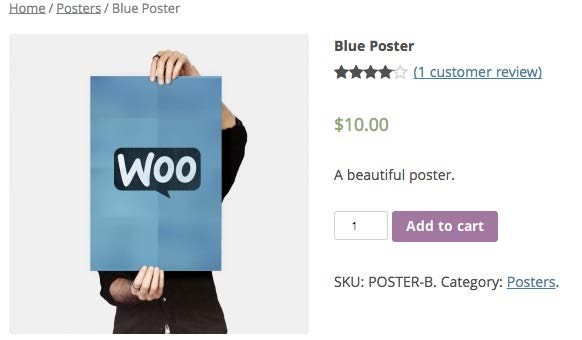
The regular product page looks as shown in the following screenshot:

For our example, we’ll be moving the product rating lower down the product page, after the product SKU and category.
Getting ready
You need at least one product with a review in your store.
How to do it…
This recipe only has two lines of code, but both of those lines have a lot of parameters in them. Follow the recipe to see how the hooks work. At the end of the recipe, there will be a link to provide more explanation on each line of the code.
There are only two things you can do with hooks: add something to them or remove something from them. Using the following steps, we’ll start by removing one of the actions from a hook:
- Open up your theme’s functions.php file or a custom WooCommerce plugin.
- At the bottom of the file, add the following code:
remove_action( ‘woocommerce_single_product_summary’, ‘woocommerce_template_single_rating’, 10 );
This code removes a specific action on a certain hook at a certain priority. If you get one of the preceding three parameters wrong, it won’t work.
Now that we’ve removed the review, we want to add it back in after the category and SKU information.
- Below the last line of code, add the following:
add_action( ‘woocommerce_single_product_summary’, ‘woocommerce_template_single_rating’, 45 );
- Save and upload the file.
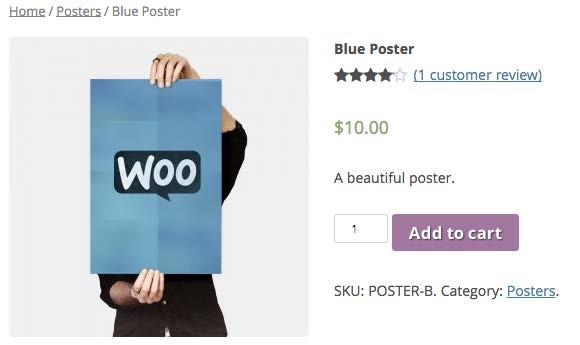
The rating is now below the Category and SKU, as illustrated in the following screenshot:

How it works…
The hooks in WooCommerce use the hooks system built into WordPress. You can learn all about hooks on WordPress.org at http://codex.wordpress.org/Plugin_API/Hooks.
There’s more…
There are hundreds of hooks in WooCommerce and all those hooks allow you to modify the way WooCommerce works. The best place to look for hooks is within the code itself.
| Displaying an image on the category |
| archive page |
Each category page in WooCommerce looks the same, with of course the exception of the products in that category. This works great for a lot of merchants. However, some merchants like to differentiate their categories—maybe add a banner at the top of the category page to help users see at a glance what they’re looking at, or some other customization.
By building on our knowledge of hooks from the preceding recipe, we can add an action onto an existing hook and display a category image.
Getting ready
You need at least one product and it needs to belong to a category. You should also have an image to represent that category.
How to do it…
In the following steps, we’re going to start off with something really easy. WooCommerce allows you to upload an image for a category, but it doesn’t display it anywhere by default. Once we get the image uploaded, then we can add some code to display it:
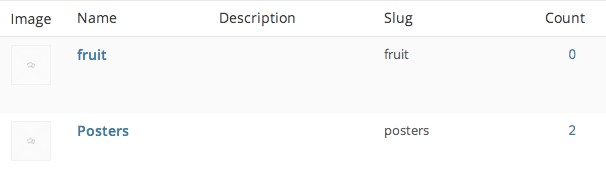
1. From the WordPress admin, go to Products | Categories. You should see a list of categories as shown in the following screenshot:
- Click on Upload/Add Image.
- Then select a photo from your media library or add a new photo.
- Click on Update.
We’ve added an image to a category. Now we need to write a function that will display that category image.
- In your code editor, open up your theme’s functions.php file or a custom WooCommerce plugin.
- Add the following code to the bottom of the file:
function woocommerce_cookbook_category_image() { if ( is_product_category() ){ global $wp_query;
$cat = $wp_query->get_queried_object();
$thumbnail_id = intval( get_woocommerce_term_meta(
$cat->term_id, ‘thumbnail_id’, true ) );
$image = wp_get_attachment_url( $thumbnail_id ); if ( $image ) {
echo ‘<img src=”‘ . esc_url( $image ) . ‘” alt=”” />’; }
}
We have a function to display the image, but we haven’t told the function when to run. We need to add one more line to do this.
- Below the code we just added, add one more line:
add_action( ‘woocommerce_archive_description’, ‘woocommerce_cookbook_category_image’, 2 );
- Save and upload the file.
You should now see the image on the category page, as shown in the following screenshot:
How it works…
This code uses the same hooks system that was discussed in the preceding recipe. The function is hooked in at the right time by using an action. The function checks to make sure we’re on a category page, then it looks in the database for an image that’s associated with the category. If it finds one, it prints the image to the page.
| Writing CSS to customize the Add to Cart |
| button |
You can do quite a bit with customizing templates and using hooks, but neither of those actually focuses on how things look. If you want to change the way something looks, such as the size, color, text family, border color, and so on, then you’ll have to use Cascading Style Sheets (CSS) to do that.
WooCommerce already has basic styles for everything included in the plugin, so you don’t have to write anything. But if you want to change something, then you’ll have to write some styles to override the default styles.
Getting ready
You should have a simple product in your store.
How to do it…
If you take a look at a simple product on the frontend of your store, the Add to Cart button that comes with it looks pretty simple, as shown in the following screenshot:
There are actually dozens of styles applied to the button, some of which are applied to all buttons and some just to the button on the product page. In the following steps, we’re going to start by writing some styles that affect all WooCommerce buttons:
- In your code editor, open your theme’s style.css file.
- At the bottom of the file, add the following code:
woocommerce button.button, .woocommerce input.button { font-size: 1.2em; }
This code will increase the font size of all WooCommerce buttons. WooCommerce buttons are styled in such a way that, as the font inside the box grows, the box itself will grow. Therefore, you just need to increase the font size and the button will grow. Now we want to style just the button on the product page.
- Add the following code beneath the code we saw earlier:
.woocommerce button.single_add_to_cart_button { text-shadow: 1px 1px 1px #333; }
- Save and upload the file.
You’ll be able to see the larger button with a text shadow on the single product page, as shown in the following screenshot:
How it works…
CSS is one of my favorite tools. It’s basically a pattern-matching system. If the elements on the page match the pattern, then the styles get applied to that HTML element. You can write really specific styles that apply to only one element on one page or something that gets applied to every page.
In this case, we’re using one of the most useful properties of CSS—overriding styles. You don’t need to override everything, just the one or two styles you want to change. You can change the background color of the button without affecting anything else, which is really powerful.
There’s more…
This is just the tip of the iceberg when it comes to writing and styling WooCommerce. If you want to write more CSS, then I recommend the free tutorials at http://www. w3schools.com/.
If you plan on customizing every aspect of the styles, then you could also remove the default stylesheet and write yours from scratch. Look into the wp_dequeue_style function, which is documented at http://codex.wordpress.org/Function_Reference/wp_ dequeue_style.
Creating a product slideshow
Slideshows are a great way to highlight different products in your store. Some themes have slideshows built-in, but then you’re very limited in terms of how you would like to configure them. You might only be able to place a slideshow on the home page or you might only be able to include so many slides. Built-in slideshow themes are pretty limiting and it’s not considered a good practice to look for this sort of functionality in a theme. Instead, if you can find a slideshow in a plugin, those are usually a bit more flexible in terms of placement and exactly how you want the slides to work. We’ll be using the WooSlider and WooSlider – WooCommerce Products Slideshow plugins together to create a slideshow of products that link to the specific product pages.
Getting ready
You’ll need the WooSlider and WooSlider – WooCommerce Product Slideshow plugins, available at WooThemes.com, installed and activated on your site.
How to do it…
The beauty of using a plugin is that we can place this slideshow on any page we want. In the following steps, I’ll be placing this slideshow on the sample page that’s created when you install WordPress. You can choose to put it on any page, including the home page.
- In the WordPress admin, click on Pages.
- Find the page where you wish to place the slideshow.
- Click on the title of that page to edit it.
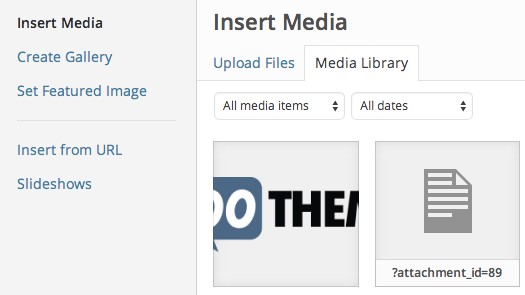
- Click on Add Media. A modal window will pop up.
- Click on Slideshows.
- Select Products as the Slideshow Type.
- Select how many slides you want through the Number of Products setting.
- You can optionally add an Add to Cart button right on the slide with the Display “Add to Cart” button setting.
I don’t think you need to clutter up the slideshow with a button. Users will likely want to know more about the product before they purchase anything, so they’ll probably click on the product title to get more information and there’s already an Add to Cart button on that page.
- You can now select what products appear in the slideshow by choosing a category, a tag, featured products only, or sale products only. You can select any mix of these that you like with the Categories, Tags, Featured products only, and On sale products only settings.
- I recommend letting users click through to the product pages by enabling the Link the Slide Title to the product setting.
- Click on Insert Slideshow and you’ll see a shortcode has been created and inserted into the content of the page.
- Click on Update to save the page.
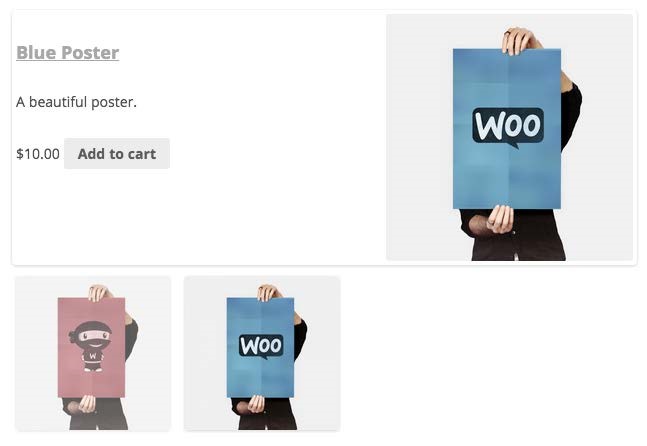
If you view the page on the frontend, you’ll see your slideshow as shown in the following screenshot:
There’s more…
In addition to showing off products, WooSlider can slide anything. You could very easily create some promotional images that show multiple products in each image, link to the appropriate category.
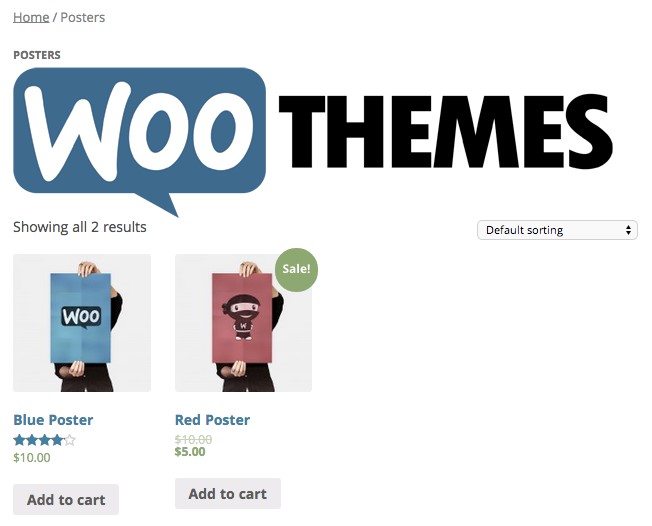
| Removing a product category from the |
| Shop page |
You may have some products that you don’t want to advertise to the entirety of your audience. Maybe they’re products that only apply to one gender, or products that are only good for someone of a certain age, or some other niche product that doesn’t make sense for your whole audience. If you make sure that the products appearing on the shop page apply to everyone, that will keep your conversion rates high.
How to do it…
To remove a product category from the Shop page, we’ll have to modify the query to the database. We can use some of the hooks built into WordPress to modify the query rather than writing an entirely new one, which is a huge time-saver. Let’s perform the following steps to remove a product category:
- In your code editor, open up your theme’s functions.php file or a custom WooCommerce plugin.
- At the bottom of the file, add the following code: add_action( ‘pre_get_posts’,
‘woocommerce_cookbook_pre_get_posts_query’ ); function woocommerce_cookbook_pre_get_posts_query( $q ) { if ( ! $q->is_main_query() ) return; if ( ! $q->is_post_type_archive() ) return; if ( ! is_admin() && is_shop() ) {
$q->set( ‘tax_query’, array(array(
‘taxonomy’ => ‘product_cat’,
‘field’ => ‘slug’,
‘terms’ => array( ‘posters’ ),
‘operator’ => ‘NOT IN’
)));
}
remove_action( ‘pre_get_posts’,
‘woocommerce_cookbook_pre_get_posts_query’ );
}
- You’ll need to change the posters in the code to the slug of the category you wish to exclude. If you want to exclude multiple categories, you should comma-separate them and make sure that each one is enclosed in single quotation marks. For example, ‘category-1’, ‘cat-2’, ‘cat3’.
If you don’t know the slug of the category you wish to exclude, you can see the full list in the WordPress admin under Products | Categories.
- Upload and save the file.
How it works…
This code is run right before WordPress queries the database. The first part checks to make sure we’re modifying the right query you wouldn’t want to accidentally break your blog page. Once we know we’re only modifying the right query, we tell WordPress to ignore certain product categories. And that’s it. It takes a bit of code to do what we want to do, but it’s pretty simple.
There’s more…
You could modify all types of queries and all sorts of things with queries. You could, for example, have a shop page that only shows featured products that were released in the last month. But queries of this type are very advanced and you’ll probably need a developer to help you with that sort of thing.