Using Multiple Currencies in Zen Cart
Using Multiple Currencies
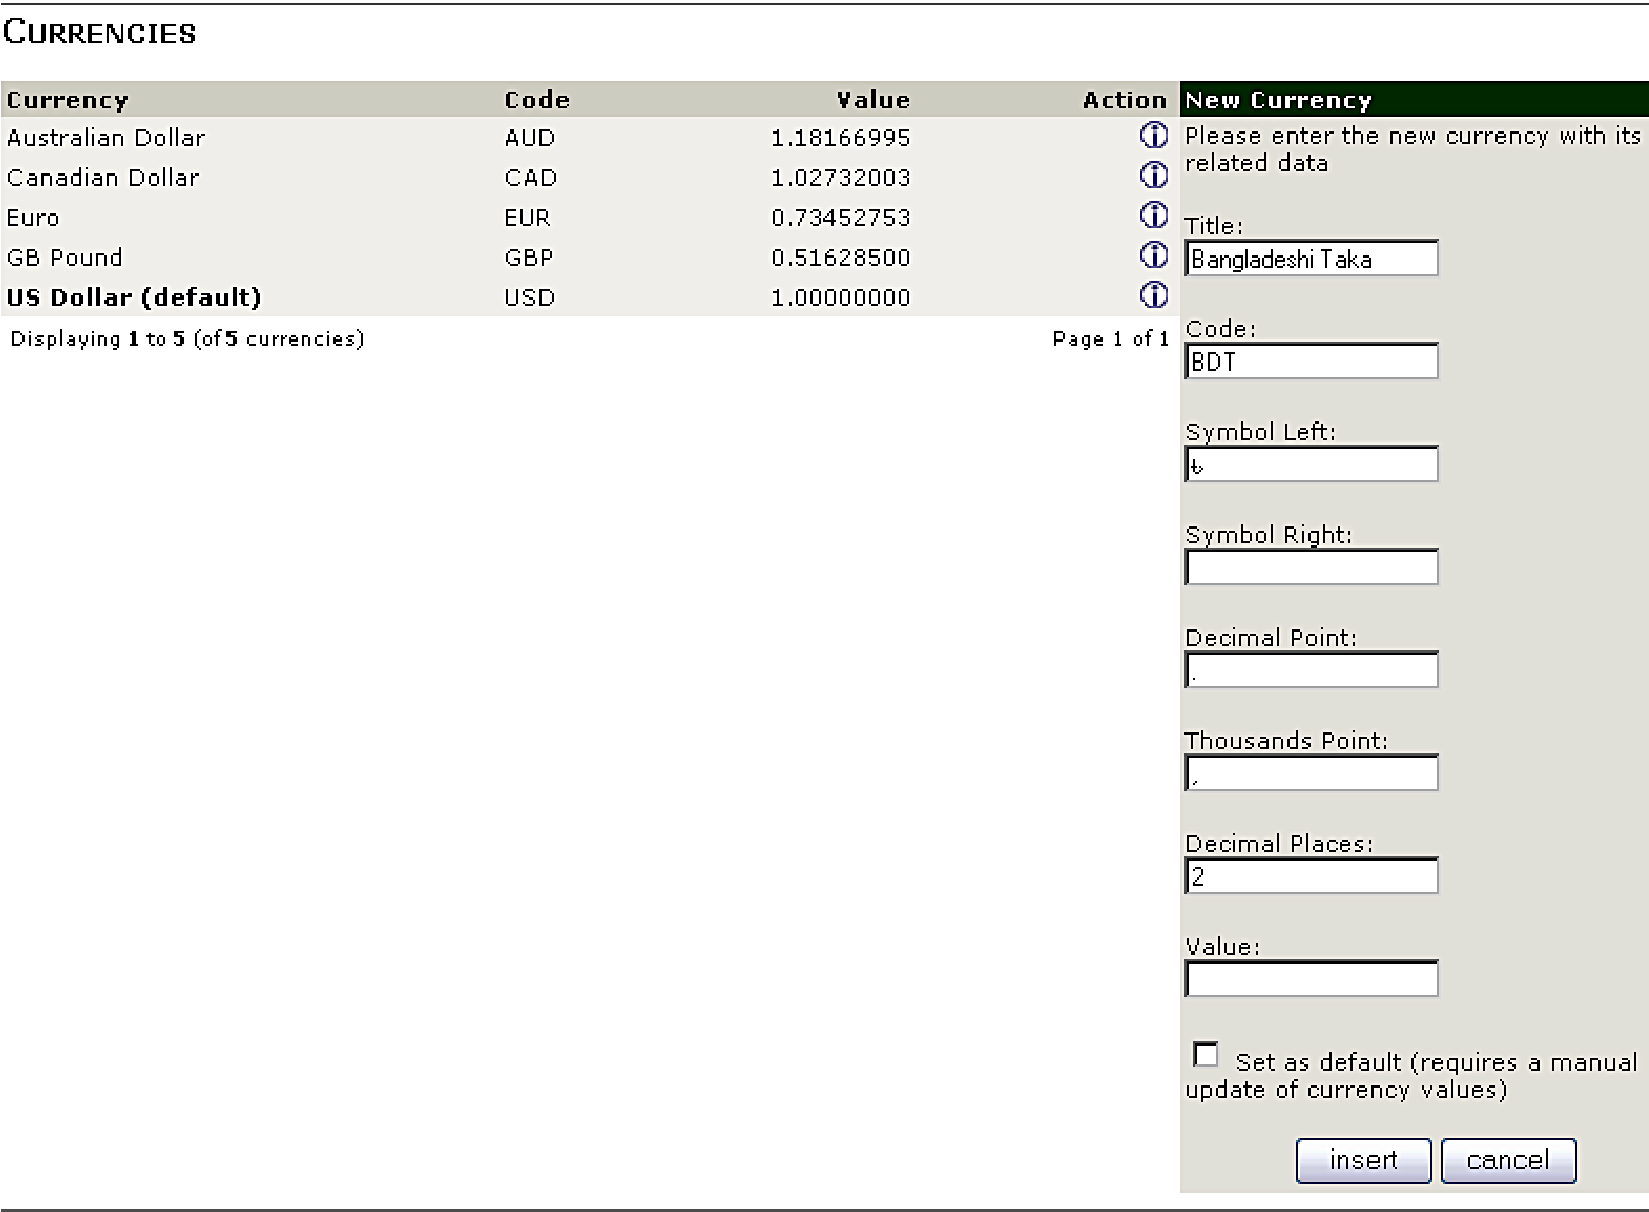
Localization | Currencies screen allows us to add new currencies or edit existing ones. The predefined currencies in this module are U.S. Dollar (default), Euro, GB Pound, Australian Dollar and Canadian Dollar. You can add a new currency, or edit an existing one.
Adding a New Currency
By default, only five currencies are defined in Zen Cart. You may need to add other currencies, if you want to trade in those currencies, or want to show prices in those currencies. To add a new currency, click on the new currency button in the Localization | Currencies screen.
Localization of Zen Cart
In the new currency screen, you need to enter the following information:
- Title: This is the name of the new currency, as in Canadian Dollar, Mexican Peso or Bangladeshi Taka.
- Code: This is the three-character ISO 4217 international name for the currency –CAD for Canadian Dollar, MXN for Mexican Peso, USD for US Dollar, JPY for Japanese Yen, BDT for Bangladeshi Taka, and so on. Note that to use the automated currency conversion feature, this code must be correct.
- Symbol Left and Symbol Right: If you need to display some symbol to the left or the right side of the currency amount, you need to type that symbol in this box. If no symbol appears before or after the amount (as in CA$ for Canadian Dollar), leave these fields blank.
- Decimal Point: This is where you indicate the symbol that appears between the whole and fractional amounts of a currency. For U.S. and Canadian dollars, this is a period; in some countries it is a comma.
- Thousands Point: This is where you indicate the symbol that appears between the figures of a currency, in thousands. For U.S. and Canadian dollars, this is a comma; in some countries it is a period.
- Decimal Places: This indicates the number of decimal places that appear to the right for this currency. The U.S. and Canadian dollars have two digits after the decimal point. Some currencies may have others, such as zero, four or six.
- Value: This is the value of the other currency relative to the default currency of our store. Our default currency should have a value of exactly 1. If you are going to use the automatic conversion feature (see the update currencies button below), then you can simply leave this field blank (or enter zero, both are the same) and let the website update the value.
- Set as default (requires a manual update of currency values): If this is the default currency for this store, you need to check this box. Note that this may require some manual changes, as indicated in the box. Thus, you might want to set this before loading any pricing data.
After you finish entering the new information, click on the insert button to save this new currency entry.
Currency Conversion
Zen Cart has a built-in facility to update currency exchange rates from the exchange rate server. For this to work, all currencies defined in our shop must use the correct ISO 4217 codes in the code column.
To update currencies, click on the update currencies button. The site will request current exchange rate values from various conversion sites on the Internet for all of the currencies that have a correct ISO 4217 code. Within a few seconds, your shop will obtain current values, and automatically update the exchange rates.
Rates that are correctly converted will be listed with a green background at the top of the page. Rates that were not correctly converted will be listed with a red background. Zen Cart shop will try more than one converter if it has failed in converting a particular currency. If you see a red item after updating currencies, you have to pay attention to it. It may be caused by misspelling the ISO 4217 code for that currency. Currencies that were not correctly updated because of the unavailability of exchange rates at the exchange rate server will have to be manually updated using the edit feature.
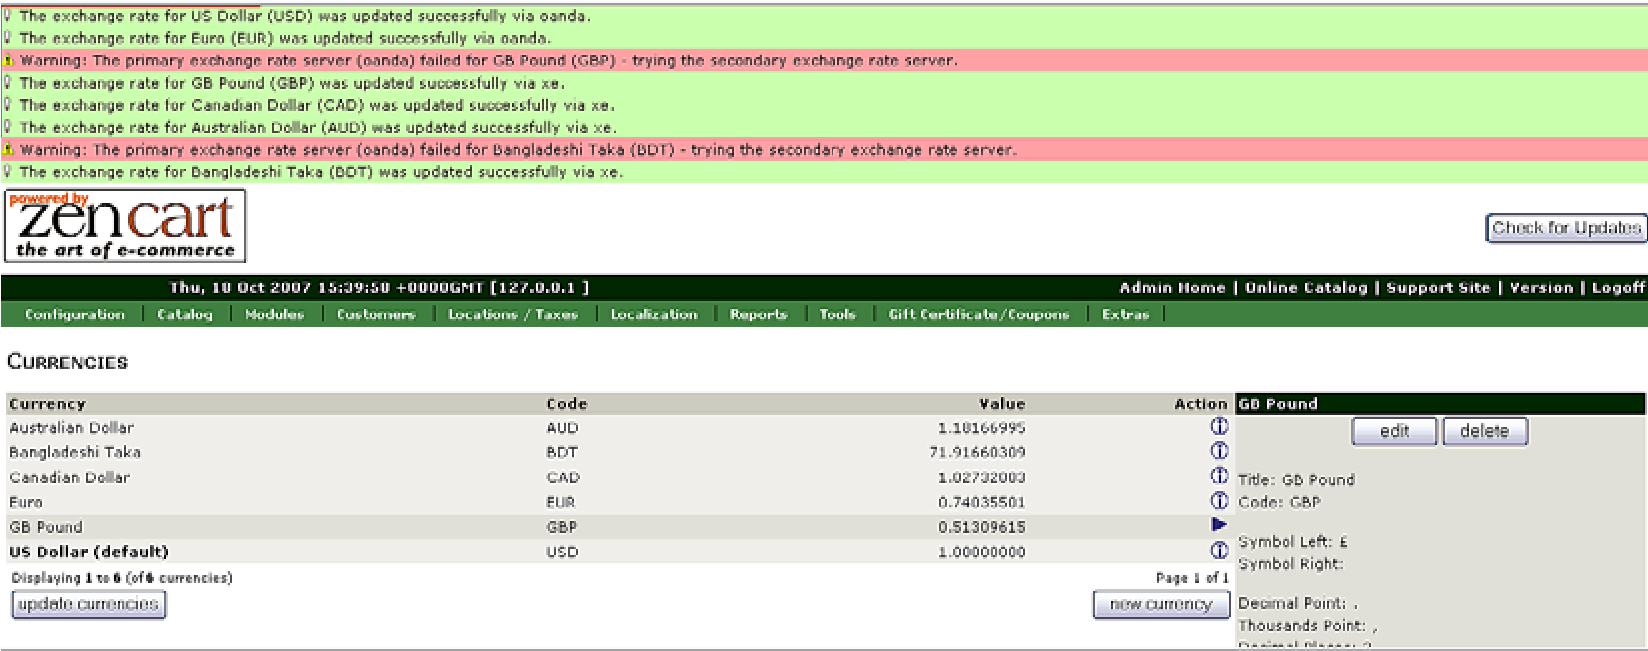
If you do not wish to use the automatic conversion feature, you can set the conversion rate manually by selecting the currency and clicking edit button. From Localization | Currencies screen, you can see the sample conversion rates. Note that these are sample values; you need to know the exact conversion rate at a given point in time, as currency conversion rates can fluctuate.
Editing a Currency
If you only need to correct the exchange rate, you can use the update currencies button to change all the conversions on our website. If, however the automatic conversion does not work for some reason (for example, you entered Russian Rubles using code RUS instead of RUB), you would need to change that. To do this:
- Click on the line showing the currency that you want to change.
A right-arrow will appear in the action column.
Localization of Zen Cart
- Now click on the edit button. A series of entry fields, the same as provided for the add new currency button, will appear, but this time those fields will be loaded with their current values.
- Change any field as required.
- Once you have finished, click on the update button to save your changes.
- If you decide not to save the changes, click on cancel to keep the original values intact.
Deleting an Existing Currency
If you no longer want a particular currency, you can delete the currency as follows:
- Click on the line showing the currency you want to delete. A right-arrow will appear in the action column.
- Click on the delete button. You will be asked to confirm if you want to delete the currency.
- Click on the delete button again to delete the currency, or click the cancel button if you do not wish to delete it.
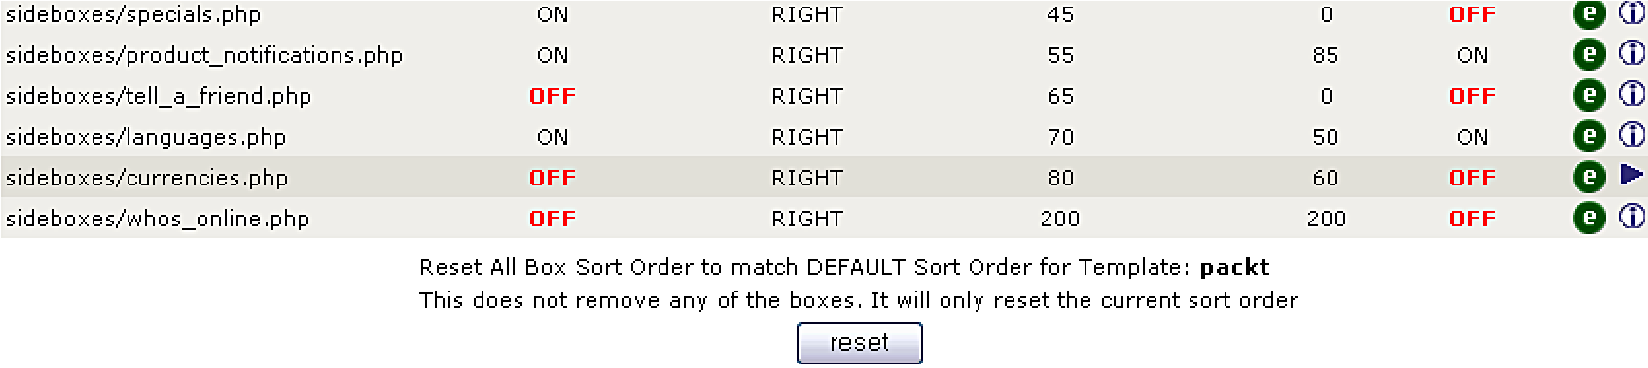
Hiding the Currencies box
If you only operate with one currency, the US Dollar for example, you may wish to delete all other currencies and set the exchange value to 1.
With only one currency in use, you will most likely want to stop the currency selection box from being displayed.
To do this:
- Click on Tools | Layout Boxes Controller.
- Find sideboxes/currencies.php in the list. It may appear at the bottom.
- Click on it, and then click on edit and set both Left/Right Column Status and Single Column Status to OFF.