
Building E-Commerce Solutions With WooCommerce: Payments, Shipping, and Coupons
We’ll need to take a closer look at the shopping process that will be offered to your customers. In this article we’ll have a closer look at:
- Payment methods and settings
- Shipping methods and prices
- Using discount coupons
Payment methods
Payment and shipping methods are both important subjects for your online store that deserve additional attention. Let’s start with the payment methods you’ll offer to your customers.
Payment methods to be used
First of all, there isn’t a best answer to this question. Looking at the payment solutions that are available worldwide you might be surprised. There are literally hundreds of possibilities. The methods that you need to offer to your customers will differ from country to country. Especially if you’re selling locally (within a specific country), you need to prepare your store for that market. If you’re not sure which payment methods you should offer, just look at the methods the other online stores in your market are offering. Here are some, possibilities, but be aware that the following list only covers the most important, widely used payment possibilities:
- Credit card
- Debit card
- Bank transfer
- Cash on delivery
- Pay after delivery
- Cheques
- Online wallets
This list explains something about the payment methods, but not about the payment provider yet. The payment provider is a company that makes sure that the online transaction is handled correctly and that your customer is offered enough possibilities to pay with the type or card of their choice. The following are some of the major players:
- PayPal
- Amazon
- Google (Google Checkout and Google Wallet)
- Alipay (China)
- Credit card companies Mastercard, Visa, American Express, and Discover
- Authorize.net
- And many, many others
It’s important to understand the difference between a payment provider and a payment gateway. The payment provider is the company used to offer one or multiple payment methods, which are in WooCommece referred to as payment gateways. For example, PayPal is a payment provider, offering payment gateways, such as PayPal Pro, PayPal Express Checkout, and PayPal Digital Goods. Often, a payment provider offers multiple payment methods.
For your store it’s likely that you need to offer a combination of payment possibilities. Let’s first have a look at what WooCommerce has to offer by default. Navigate to WooCommerce | Settings | Payment Gateways.
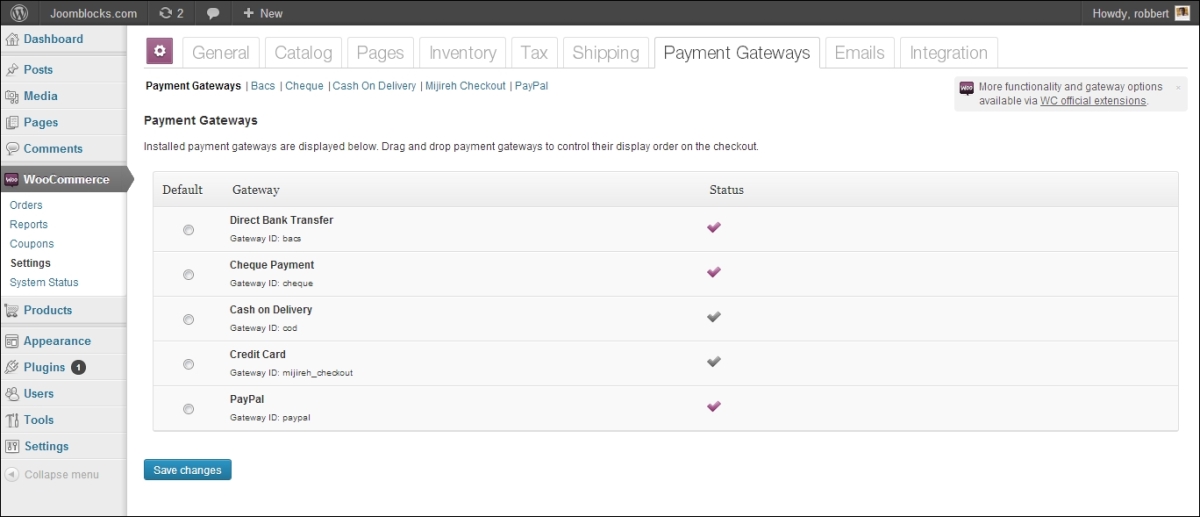
We see the following options in the preceding screenshot:
- Direct Bank Transfer
- Cheque Payment
- Cash on Delivery
- Credit Card
- PayPal
In fact, these are all offline payment methods, except for PayPal and credit card, where credit card payments are handled by Mijireh Checkout. This is a payment service provider offering lots of different payment possibilities in almost 70 countries.
All other options mentioned previously are offline payment methods. This means that your customer can use that method if you offer it, but the actual payment is not carried out immediately. You’ll have to manually check later on, if you received the money from your customer. Online payment methods immediately do the payment transaction online, at the moment of sale. In most cases the payment is verified automatically and the order status in WooCommerce will be updated accordingly.
What you need to know about credit cards
When you want to accept credit cards in your store, you’ll soon hear something about Payment Cards Industry (PCI) compliancy. The issue is that if you let your customers enter their credit card details directly on your website, you must be PCI compliant. If you’re not, you’re running an illegal business. The downside is that getting your website PCI compliant is difficult. Especially for small shops or starters it’s even almost an impossible goal.
If you’d like to know more about this subject, the following website may be useful:
http://www.pcicomplianceguide.org/
So, how are we going to solve this? We still need to be able to accept credit cards in our store. Luckily, this is where the payment service providers jump in. These are third party companies handling the payment transactions for you in a secured way. Mijireh checkout, that we just mentioned, is just one of the, many options you have. Besides that, PayPal is also offering the possibility to accept credit card transactions.
But there is more. Just by checking out the WooCommerce extensions page, you’ll get an idea of what’s possible for your market:
http://www.woothemes.com/product-category/woocommerce-extensions/
Select Payment Gateways and your country to receive an overview of available, payment extensions for WooCommerce.
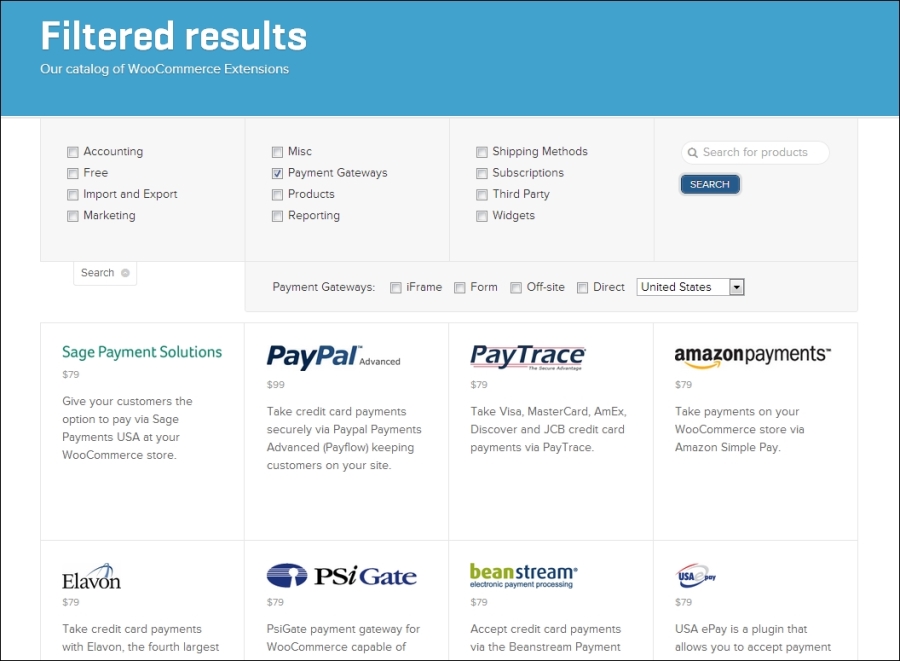
The extensions to support payment service providers aren’t free and recently WooCommerce raised all prices. Sometimes the payment service provider of your choice might offer a free extension for WooCommerce when you sign up. Just make sure that you check if it is available. Installing an extension works in the same way as with any regular WordPress plugin.
It’s wise to take some time to find the right payment service provider for your market. Pay attention to the rates charged by the payment service provider (as well transaction fees as monthly rates) and the way they will pay you after the transaction.
Setting up a contract with a payment service provider of your choice and the way the setup is done in WooCommerce differs a lot. Therefore, in our following example, we’ve just chosen to stick to the default options of WooCommerce.
Setting up PayPal
Setting up PayPal in your WooCommerce store is very simple. Of course you first need to create a PayPal account if you don’t have one yet at http://www.paypal.com. Mark it as a business account and enter your bank account details to be able to transfer money from your PayPal account to your regular bank account.
Next, in WooCommerce, click on PayPal at the top of the Payment Gateways tab.

Enter the e-mail address that you used to create your PayPal account:
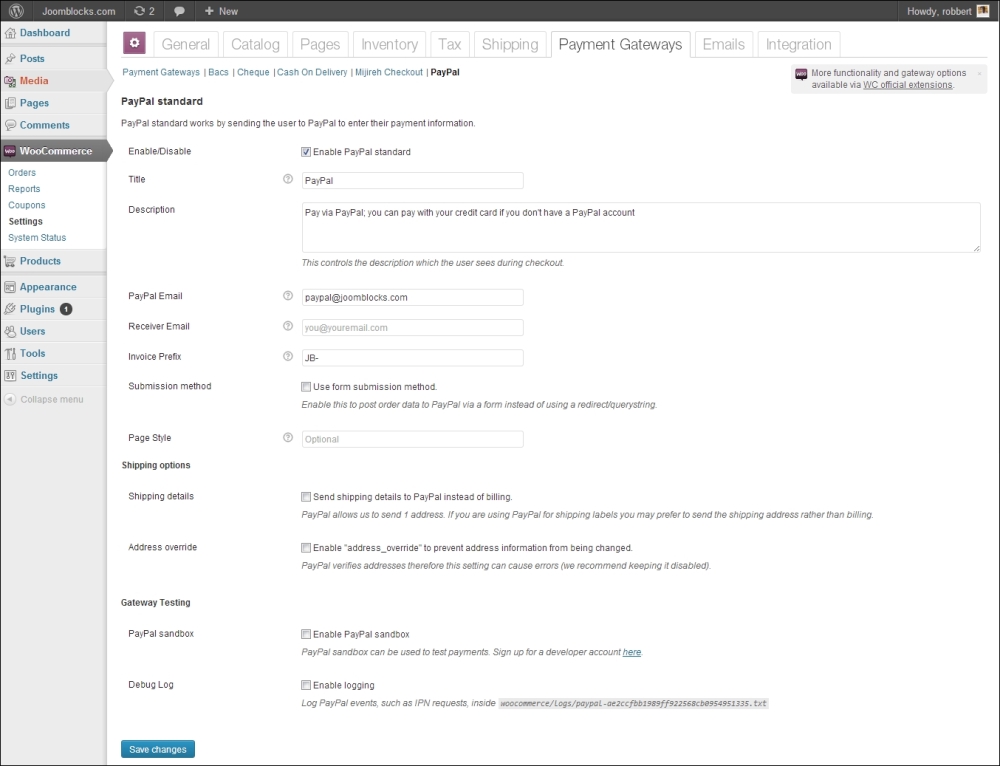
Note that you have the following possibilities:
- Use an invoice prefix that is used to create the transaction number. By default this is WC (from WooCommerce), so you might want to use something different. Note that the invoice number will be sent to PayPal including the prefix. If you would be running multiple WooCommerce stores using one PayPal account, you need to use a different prefix for every store.
- Use page styles, defined within your PayPal account, to be able to offer a nonstandard look and feel of the PayPal checkout page.
- You can use a PayPal Sandbox function, to test your transactions, before your store is opened for customers. Note that by default this sandbox is switched on, so don’t forget to change that while bringing your store live! For more information about the sandbox functions of PayPal, see https://developer.paypal.com/.
Tip
Regardless of the payment service provider you’re using make sure that you test your setup thoroughly. Don’t hesitate to buy, and pay for a product in your own store. It’s important that you’ve actually checked the process completely, instead of assuming that it will work!
For the other, offline payment methods, it’s just a matter of enabling or disabling them as you please. You are able to change the description that your visitors will see for every payment method. The Cash on Delivery payment method also gives the possibility to connect it to a shipping method. That’s useful so you’ll be able to set a different price for using this method, since Cash on Delivery is often an expensive choice.
Shipping methods and prices
Just as with payment methods, we also need to think about the shipping methods we are going to offer to your customers. Where are we going to ship to? Do we charge our customers for it and if yes, does the amount depend on the shipping address, the weight of the products, or both? Also in here we have to think about several aspects:
- Which carrier(s) are we going to use?
- Is there any integration of our orders needed with that carrier or will we work manually?
- What are our shipping prices and in which way are we going to calculate the shipping to our customers?
- Looking at the functions WooCommerce is offering we see a similar screen as used for payment methods. There are a couple of settings that we need to check.
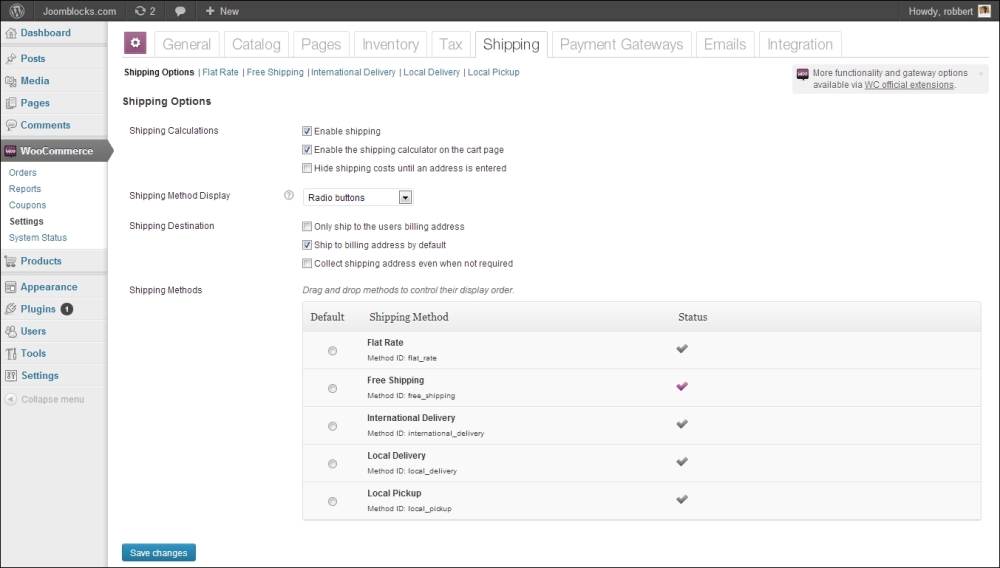
- First of all decide if we need shipping at all. By default, the field Enable shipping is checked, but if we are only selling downloadable products we can switch it off.
- Next, we must decide if we want to show the shipping calculator on the cart page. This is a function that gives customers the possibility to check the expected shipping costs in an early stage. We could switch it off if we would only charge a fixed amount or use free shipping.
- It’s possible to hide the shipping costs amount as long as the customer does not enter an address. Useful while you’re using variable shipping costs, based on the customer address.
- We also need to decide if we want to show shipping methods using Radio buttons or checkboxes. Normally the radio button makes sense, since customers will be selecting one of the available options.
- Finally, we must decide if we give the opportunity to enter a (different) shipping address at all or Only ship to the users billing address. Even if we keep this switched off, it still makes sense to ship to the billing address by default. That’s just more convenient for your customers. WooCommerce will not ask for a shipping address if it isn’t needed. If we still want to have that address available, we could check the field Collect shipping address even when not required.
Beneath the settings we’ll find all standard available shipping methods. This is what WooCommerce has to offer:
- Flat Rate: This is a fixed amount of shipping costs for all orders.
- Free Shipping: This speaks for itself. Note that this method is enabled by default.
- International Delivery: This is for customers outside of our own country. Similar to Flat Rate shipping. The amount does not differ per country.
- Local Delivery: This is for customers living near us. We could enter the zip codes to specify when this method will be available
- Local Pickup: Instead of delivering the order, our customers could also pick it up of course. WooCommerce assumes that in this case there’s no charge for our customer.
Let’s take a closer look at the Flat Rate method, just to check how we need to configure it. Just click on the Flat Rate link at the top of your screen. Although the shipping name Flat Rate seems limited, this method still gives us lots of possibilities. The Flat Rate method will calculate one shipping rate per order, regardless of the weight and dimensions of the products in that order.
The Flat Rate can differ per country, but will not look at the city or zip code of your customer.

To demonstrate the possibilities of the Flat Rate method, we used some of the additional functions.
- First of all, above all options, we need to check the field Enable this shipping method otherwise nothing will happen at all.
- The rate of 4.95 dollars we created is only applicable when shipped within the USA.
- We created an additional rate of 9.95 dollars for express deliveries. Also this rate is a fixed amount for the complete order, although it’s also possible to set a rate based on a shipping class or product line. Note that the 9.95 dollars will be added to the Flat Rate, giving a resulting amount of 14.90 dollars, excluding tax.
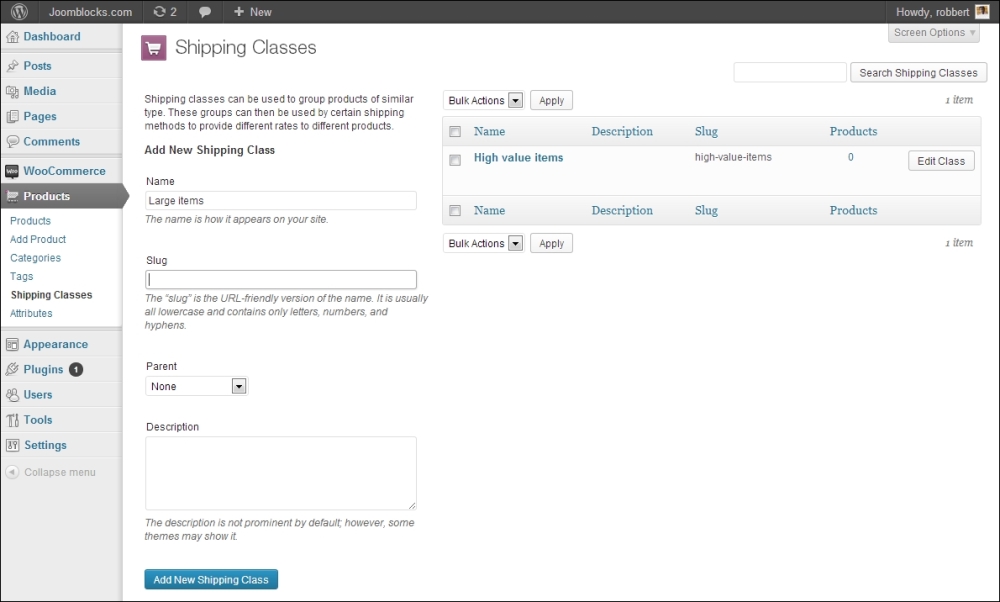
- Beneath that, we added additional costs of 5 dollars per order if it contains products we’ve marked as High value items. This is a shipping class we created for expensive products that we may need to ship using insurance.
As you can see, this shipping method already gives more flexibility than just one single Flat Rate. Look at the following resulting page that our customers will see while placing an order:

Looking at the available shipping methods, we can imagine running short on possibilities. What if we need a shipping method that calculates the shipping rate based on delivery address and the products that we’ll ship? That’s no longer Flat Rate anymore and the other shipping methods do not offer a solution. In such a situation, WooCommerce needs additional extensions.
A good and very flexible, but pretty expensive extension would be the Table Rate shipping plugin. It’s available for 199 dollars at the WooCommerce store: http://www.woothemes.com/products/table-rate-shipping-2/
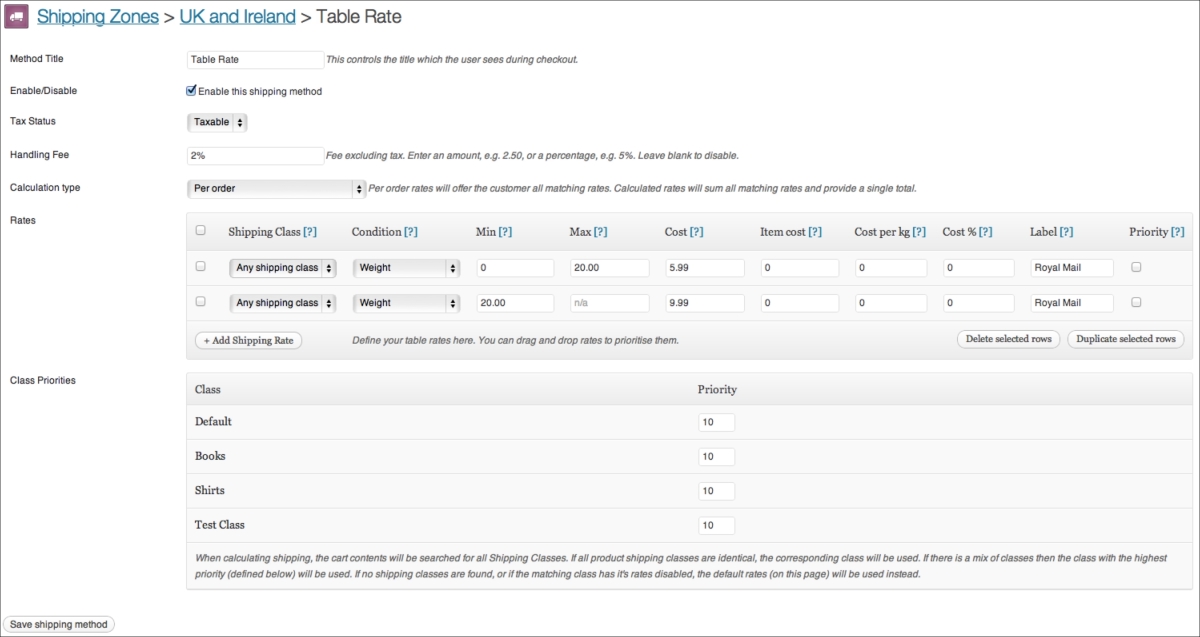
Shipping classes
You must have previously noticed that we have been using a shipping class during the setup of our Shipping method. A shipping class is nothing more than a connection between a product and a certain way of shipping. In other words, a shipping class can be assigned to a product. If we define multiple shipping classes, it becomes easier to use different shipping rates for different types of products. Defining shipping classes is just as easy as creating new categories. Just navigate in your WordPress menu on the left to Products | Shipping classes. Just enter a Name and Description for your class and click on the button Add New Shipping Class.
Carrier integration
As with payment methods, there are lots of carriers on the market that offer integration with WooCommerce, so that you will not have to handle shipping transactions manually. There are too many possibilities to mention here, but there’s always an extension needed to connect WooCommerce to a specific carrier.
If you’re in need of integrating a carrier, head back to the WooCommerce website to check if there’s an extension available at http://www.woothemes.com/product-category/woocommerce-extensions/. For major players such as UPS and FedEx extensions are available, but these extensions will only calculate the correct shipping rates for these carriers.
Using discount coupons
There’s one more topic we would like to discuss in this chapter. Working with discount coupons gives you the possibility to organize promotions for your existing customers, subscribers or any other target group. WooCommerce has the basic functionality on board to be able to work with discount coupons. You may find them in the menu by navigating to WooCommerce | Coupons.
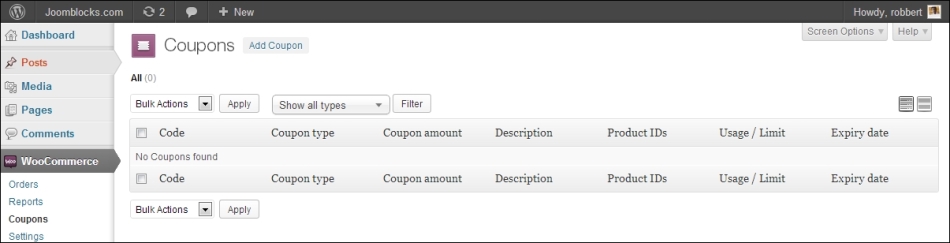
To add a new coupon, click on the Add Coupon button at the top of the screen.
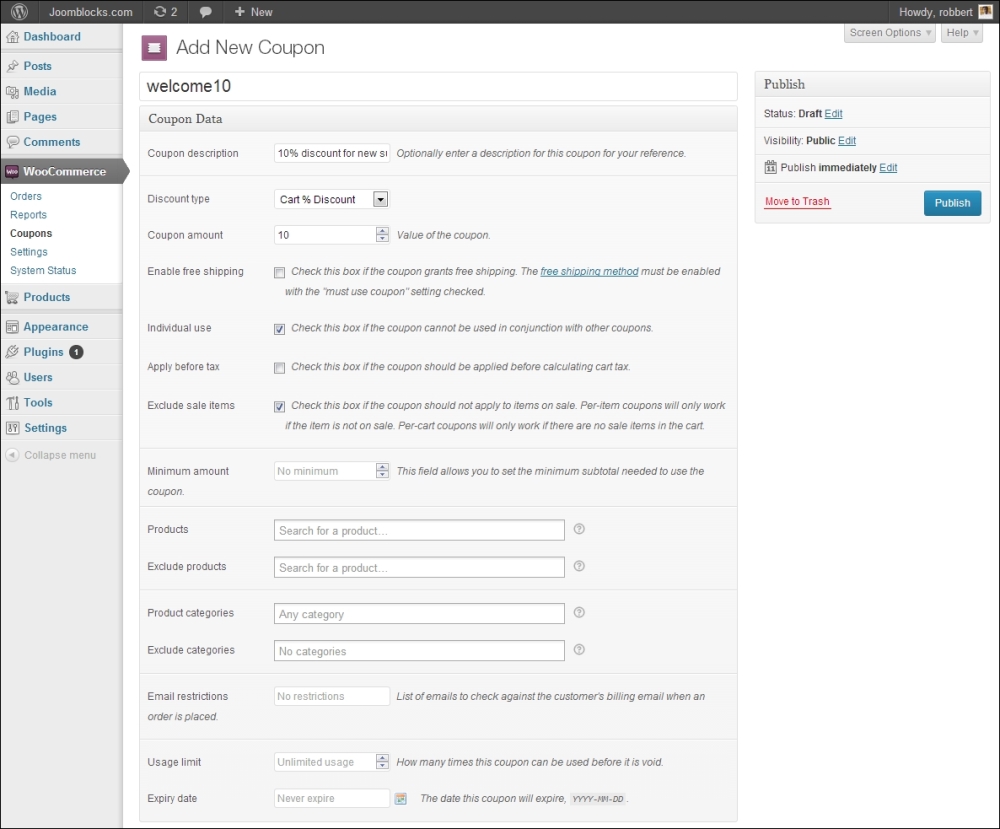
In the preceding example we created a simple coupon that gives a 10 percent discount on the whole cart for all new subscribers. To enable our coupon, we now simply need to click on the Publish button.
The coupon function delivers several possibilities, let’s go through the fields one by one.
- First of all, set the Coupon code at the top of the screen. This is the code that your customers need to enter to be able to receive the discount.
- Next, enter a Description for your coupon, so that you will recognize it later on.
- An important one is the Discount type field. You may choose to give a discount as a fixed amount per product, as a percentage of the sale price per product, as a fixed amount for the whole cart, or as a percentage for the whole cart. We used this last one, setting the Cart % Discount.
- Beneath the type field, set the amount or percentage of discount you want to give in the Coupon amount field.
- Besides the mentioned possibilities for giving an amount or percentage of discount, it’s also possible to offer free shipping to your customers by using a coupon. Check the Enable free shipping field if you want to use this function. However, note that it’s also needed to enable the free shipping method we saw earlier and set it so that a coupon must be used.
- Check the Individual use field if you want to prevent your customers from combining several coupon codes.
- Determine if you need to give a discount before or after the sales tax calculation. Check the box if you need to calculate the discount on the amount excluding sales tax.
- Can your customers use the coupon to buy items that are already on sale? If not, check the Exclude sale items field.
- Sometimes we might want to run a promotion like Receive 20% discount on all orders of $100 and over. Use the field Minimum amount to set such a minimum order amount.
- Next, we can limit our coupon code to certain products or categories, or even exclude certain products or categories from the promotion. Just choose whatever is most convenient in your situation.
- Use the Email restrictions field if you want to make this field available only to some specific customer(s). You must know the e-mail address they will use to place their order to be able to use this.
- Finally, there are two more settings to limit the usage of our coupon. First, we can set how many times this coupon may be used. Note that the Usage limit setting on store level, this won’t stop a specific customer to use the same coupon code multiple times for different orders. We can also give this coupon an Expiry date, so that when that date is reached, the coupon will no longer work.
At the Cart or Checkout your customers will be asked to enter a coupon if they have one.

Note that the way this looks completely depends on the theme you’re using. Be aware that as soon as you enable the usage of coupons, potential customers that do not have one might be distracted and leave the cart to start searching for one. Sometimes it’s just better to keep the function disabled, if you’re not running any promotions where coupons are needed.
Once your customer has applied the coupon to the order, the order review section looks as follows:
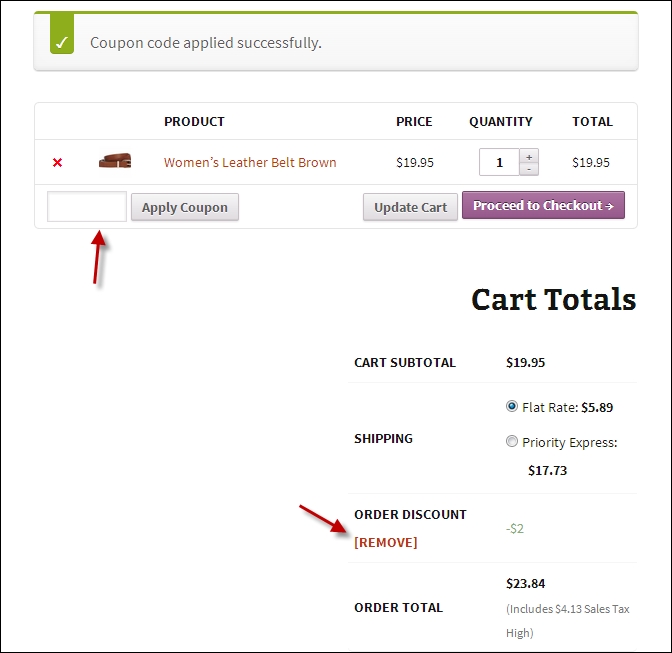
Note that after adding the coupon, your customer can delete the coupon code again by clicking on the REMOVE link.
Depending on the settings of your coupons, it will be allowed or disallowed to use multiple coupons for the same order. However, if multiple coupons have been used, clicking on the REMOVE link will remove all of them at once.
Summary
During this chapter we’ve learned to work with the default payment possibilities WooCommerce is offering. However, every country is different and it’s important that you use the right payment solution for your area. We’ve also learned how to use the functions WooCommerce offers to calculate shipping costs. Finally, we’ve worked with discount coupons, to be used for marketing purposes.